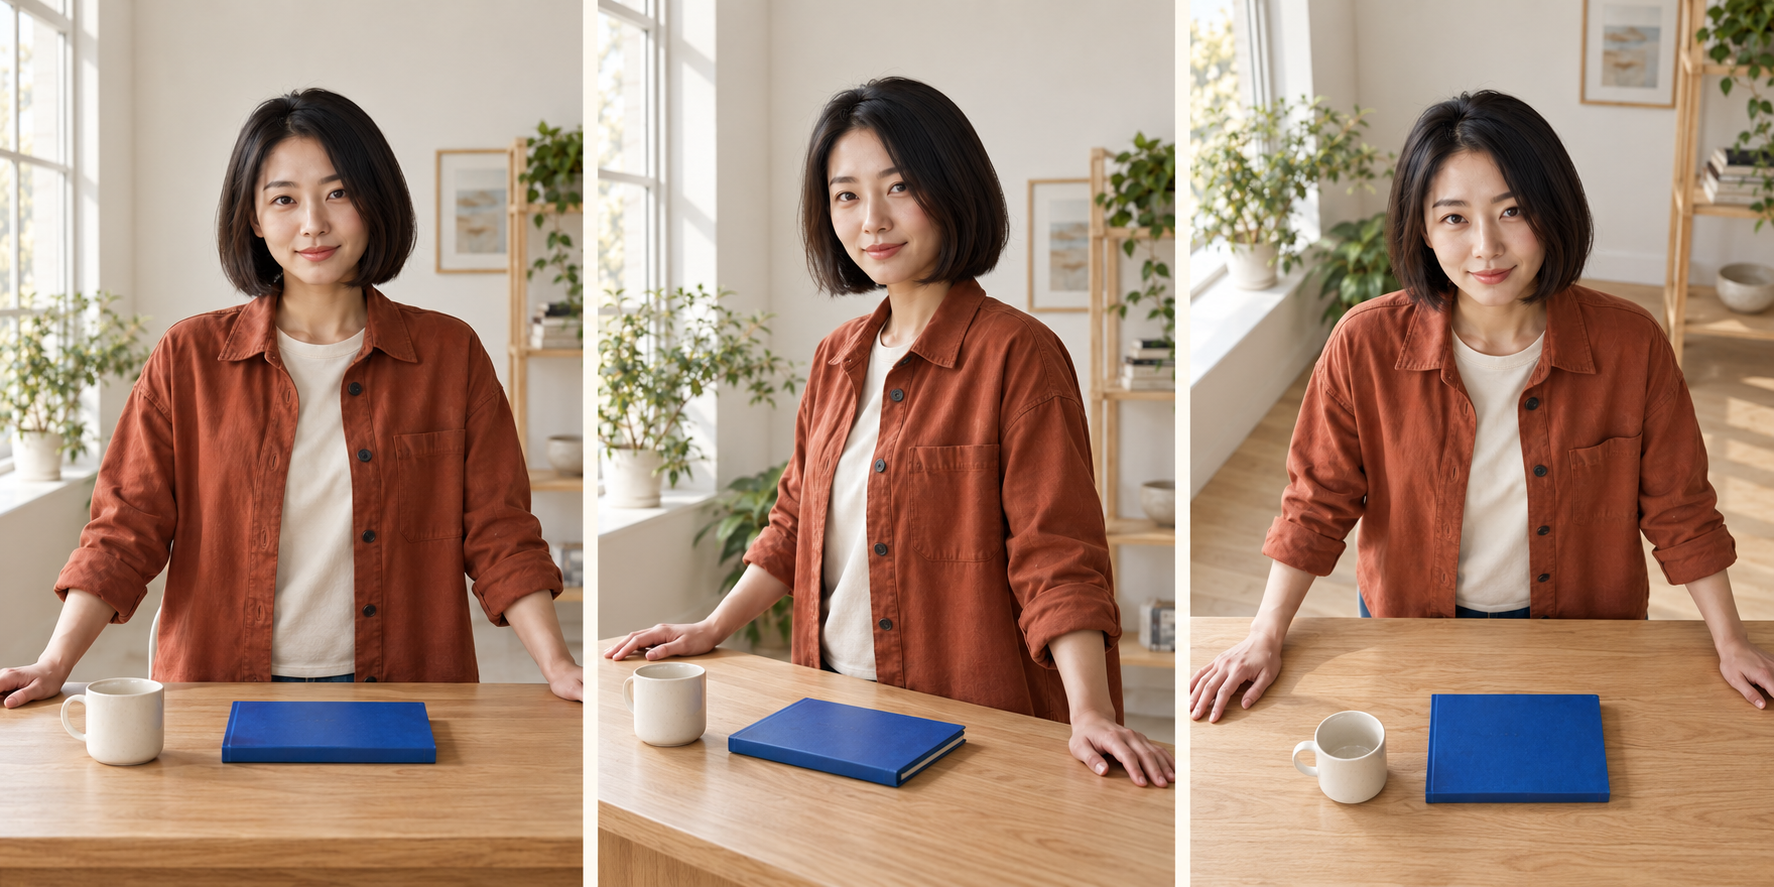
Higgsfield Angles changes the viewpoint of a still image. It is useful when a creator portrait or campaign scene needs a front view, a three-quarter view or a higher perspective. Begin with a clear reference, choose the viewpoint for a specific layout and review what the new image changes before accepting it.
This independent guide uses official sources checked October 3, 2026. It includes an original fictional creator reference, an illustrative three-view set, three editable briefs and a blank review worksheet. The artwork was made with a separate image-generation tool for this article. It is not a Higgsfield output, a calibrated reconstruction or evidence of a completed paid test.
What Higgsfield Angles does
The official Angles walkthrough describes uploading an image, selecting a perspective through quick selections, rotation or sliders, then generating a new still. It also describes brightness and color controls. Check the controls available in your current account before following an older screenshot.
The Angles app page lists Angles separately from Shots, Zooms and Transitions. That separation matters when preparing a job: a new camera viewpoint, a different crop and a moving clip serve different purposes. Choose the operation that produces the asset your campaign needs.
| Your goal | What changes | What to inspect |
|---|---|---|
| A new angle of the same scene | Camera viewpoint around the subject | Identity, object geometry and scene relationships |
| A tighter composition | Framing or crop | Subject size and useful space for the layout |
| A new story shot | The composition or scene event | Whether it adds the missing story beat |
| A moving camera in a video | Viewpoint over time | The path, motion and continuity through playback |
A three-quarter image can be a useful input to a video workflow, but it is still one image. It does not show whether the face holds during a camera orbit. For motion instructions, read the AI camera movement guide. For a coordinated sequence of scenes, read the storyboard guide.
Prepare a reference with details you can actually check
Our fictional creator has a straight dark bob, a rust overshirt and a cream T-shirt. She stands behind an oak desk with one closed cobalt notebook and one cream cup. The cup sits to the notebook's left in the physical scene. Those anchors make a new angle easier to judge than a crowded set with several similar objects.

Download the original native-resolution front reference. Use an approved image of your own creator when the campaign needs another identity. Preserve the original file so you can compare a result with the starting material instead of comparing only the latest versions with each other.
Identify which details are visible and which are unknown. The reference shows the notebook cover and the cup handle; it does not prove every detail of the notebook's hidden side or the cup's back surface. A generated viewpoint can supply plausible detail without establishing that it matches a real object.
For an actual product, add genuine reference photos of the relevant surfaces where the chosen workflow supports them. Compare seams, openings, shape and packaging with those photos before using the result in a listing. A convincing generated side view is not a measurement or a substitute for the product's actual construction.
Choose an angle for the job the image needs to do
Start with one useful change. A front angle suits a straightforward creator introduction. A three-quarter angle can reveal depth around a product. A higher angle can show the arrangement on a desk. The choice should support the layout or story, rather than simply producing another attractive picture.
| View to request | Useful job | Detail to keep visible |
|---|---|---|
| Eye-level front view | A recognizable host portrait | Face, wardrobe and the main campaign prop |
| Three-quarter view | A product moment with visible depth | Notebook shape, face and the relationship between props |
| Moderately elevated view | A desk or campaign planning scene | Desktop arrangement without losing the creator's face |
| Low view | A deliberately more imposing composition | Natural proportions and the intended expression |
| Rear or extreme side view | A specific missing story shot | Reference evidence for newly revealed details |
Use a small angle change first when identity is the main requirement. Extreme viewpoints reveal more surfaces that the original image never showed. If the rear view is essential, prepare evidence for the outfit and object details instead of assuming a single front image fully defines them.
Describe camera placement and subject pose separately. “Move the camera to a three-quarter viewpoint while the creator remains in the same pose” is a different instruction from “the creator turns toward the window.” Mixing those changes can make it hard to tell whether the result solved your original framing problem.
Compare the front view with the illustrative angle set
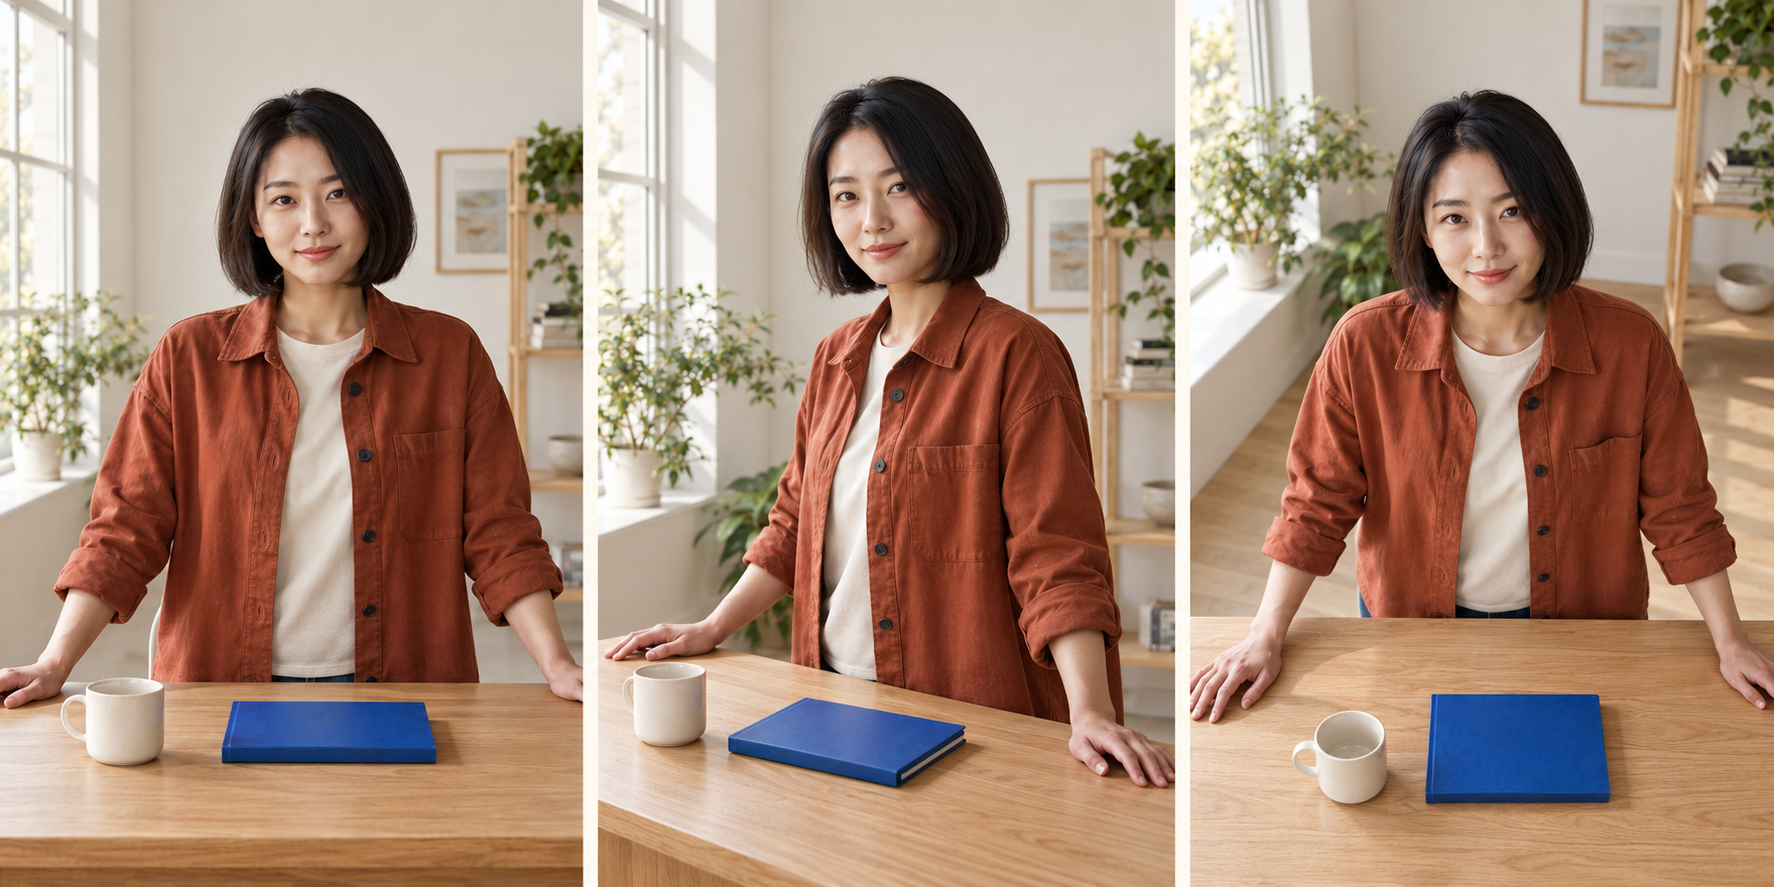
Download the original angle comparison. The panels illustrate the intended framing differences. They are generated interpretations, not three photographs taken around a measured physical set. The request's angle values are creative directions rather than verified camera coordinates.
Notice how the notebook's visible side and the cup opening change with perspective. The middle panel reveals a lighter notebook edge that was less apparent in the front reference. That is a reason to inspect the actual product reference before approving the set, not proof that the new edge is correct. The higher view makes more of the desktop visible while changing the apparent shape of the cup rim.
Compare the creator too. Look at the face proportions, hair length, collar and sleeve folds. Recognition at thumbnail size is only the first check. Review the image at the size you intend to publish, and compare it with the source beside it. Decide whether a change is a perspective effect, an acceptable creative variation or a detail that needs revision.
Three camera angle prompts to adapt
These original briefs describe the desired image and its invariants. Use the chosen interface's angle controls where provided; the briefs do not imply every operation accepts the same prompt field or syntax.
Front creator view: use the approved fictional creator reference for the face, straight dark bob, rust overshirt and cream T-shirt. Eye-level frontal medium composition behind the oak desk. Keep one closed cobalt notebook and one cream cup in their established positions. Both hands rest on the desk. Preserve the soft left-window daylight. No extra objects or lettering.
Three-quarter creator view: move the camera to a moderate three-quarter viewpoint around the approved desk scene. Keep the creator's pose, outfit and object positions fixed. Show the same recognizable face, closed cobalt notebook and single cream cup. Preserve materials and daylight direction. Do not replace camera movement with a different body pose or add a product logo.
Higher desk view: place the camera moderately above eye level, looking down toward the same creator and oak desktop. Keep the face recognizable and both props visible. Preserve the dark bob, rust overshirt, notebook shape and cup count. Keep the notebook closed and the hands resting naturally. No overhead extreme, new props or change of location.
Download the three original angle briefs. Replace our fictional identity and props with your approved references. Keep a written list of details that must remain constant, then change the viewpoint before adding a new outfit, location or lighting direction.
Review each new angle with a blank worksheet
Download the blank angle review worksheet. It leaves the reference, requested view, observations and decision fields empty. Fill it with evidence from your own generated files. No accepted result or quality score is supplied.
| Review area | Question to answer | Useful revision |
|---|---|---|
| Creator identity | Does the new face remain the approved person | Use a smaller angle change or a clearer identity reference |
| Wardrobe | Are collar, color and visible construction consistent | Keep the outfit instruction explicit |
| Product shape | Do new surfaces agree with genuine product evidence | Supply the relevant real reference where supported |
| Scene relationships | Are the same objects in plausible physical positions | Fix object count and the original arrangement |
| Composition | Does the view fit the intended crop and layout | Change framing without redesigning the scene |
| Lighting | Does the set read as one coordinated campaign | Resolve the light direction before generating more views |
When a result fails, name the failed detail before revising. “The face changed” suggests a different next action from “the cup was duplicated.” Save the rejected result, prompt and settings beside the accepted reference so a later revision has a clear reason.
Check access and keep image angles separate from video motion
The public Angles listing displays a Pro label. It does not establish that a particular account has free angle generation or what one selected job costs. Check the current operation, allowance and charge before submitting. Use the pricing and credits guide for campaign budgeting.
The official Figma plugin page also lists Angles for generating front, side and three-quarter perspectives. That is a separate working surface. Confirm account access and the controls available there; do not assume a web offer applies to every connected workflow.
Once you accept a still, give the video brief a new observable action. A fixed three-quarter portrait could become a short creator reaction, while a desk scene could use a subtle camera move. Inspect the whole export for identity and prop continuity. The reference-to-video guide explains assigning those inputs clear roles.
Build a coordinated creator campaign in Clout
Clout lets you create an original recurring character and coordinated photos and video scenes. Start with the creator your audience should recognize, then plan the views needed for a campaign: introduction, product moment and next story scene. Review each asset against the same identity and creative brief.
Create your campaign creator in Clout. For a planned reference set, use the creator photoshoot workflow; for fashion campaign planning, use the AI lookbook guide. Clout publishes this independent guide and offers its own creator workflow. This article does not claim that Clout reproduces every Higgsfield Angles control.