You have one creator and three campaign outfits. The hard part is keeping the face, body proportions and product details consistent while the clothing changes. An AI clothes changer can help with visual styling, but a useful result needs more direction than ‘put this person in a new outfit.’
This guide gives you a repeatable brief for outfit changes, an approval process for fashion content, and a way to turn an approved look into a full creator campaign. The prompt examples below are starting points to test, not guaranteed outputs.
Choosing what to wear is a separate task from changing a garment in a photo. Use the AI stylist guide for wardrobe combinations and creator styling briefs.
Plan a clothes swap around the garment you need to show
A clothes swap can mean a new styling idea or a specific garment transfer. Those are different briefs. For a fictional creator campaign, you may explore a cobalt blazer and charcoal trousers. For an ecommerce listing, you need the actual blazer's shape, fabric, pockets and closures to survive the edit. A visually appealing outfit is not enough when the garment itself is the product.
Choose an AI clothes swapper by the inputs and editing scope it supports. Can you supply both a person and a garment? Can you change only the upper body? Can you inspect a full-resolution download? A broad outfit generator and a selected-area photo editor can create similar-looking previews while giving you different control over the untouched scene.
To change an outfit in a recurring creator series, keep a written list of invariants: face, hair, body proportions, pose, crop and light direction. Change the garment first. A new location, hairstyle and outfit in one attempt makes it harder to identify why the person drifted.
Compare a reference clothes changer with a written image edit
The Magic Hour AI clothes changer help requires a person image and a separate garment image, with Entire Outfit, Upper Body and Lower Body scopes. Its help warns that accessories are not all guaranteed to change and that the clothes changer does not select one individual inside a group photo. The same help points to its image editor for precise written edits or group-image work.
That distinction is useful beyond one provider. A clothes swapper AI workflow transfers a supplied visual garment; a written edit interprets your description. Select the narrower operation that matches the task. Do not put a second person into a garment field and assume the tool will infer which jacket you intended to borrow.
| Task | Starting material | Review priority |
|---|---|---|
| Replace one top | Clear person photo and visible garment reference | Neckline, cuffs and hands |
| Explore a new outfit | Identity reference and written styling brief | Same creator and coherent proportions |
| Change only a color | Original image with selected garment region | Keep the cut, texture and closures |
| Edit someone in a group | Clearly identified subject and a suitable local editor | Other people and surrounding scene |
Download an original garment and creator reference concept
The image below pairs a fictional cobalt blazer with a fictional adult creator wearing a similar styled look. We generated it as original reference artwork for explaining the brief. It is not a before-and-after tool test, a verified garment transfer or evidence of physical fit. Compare the pockets, buttons and silhouette yourself; visual similarity does not establish an exact product match.
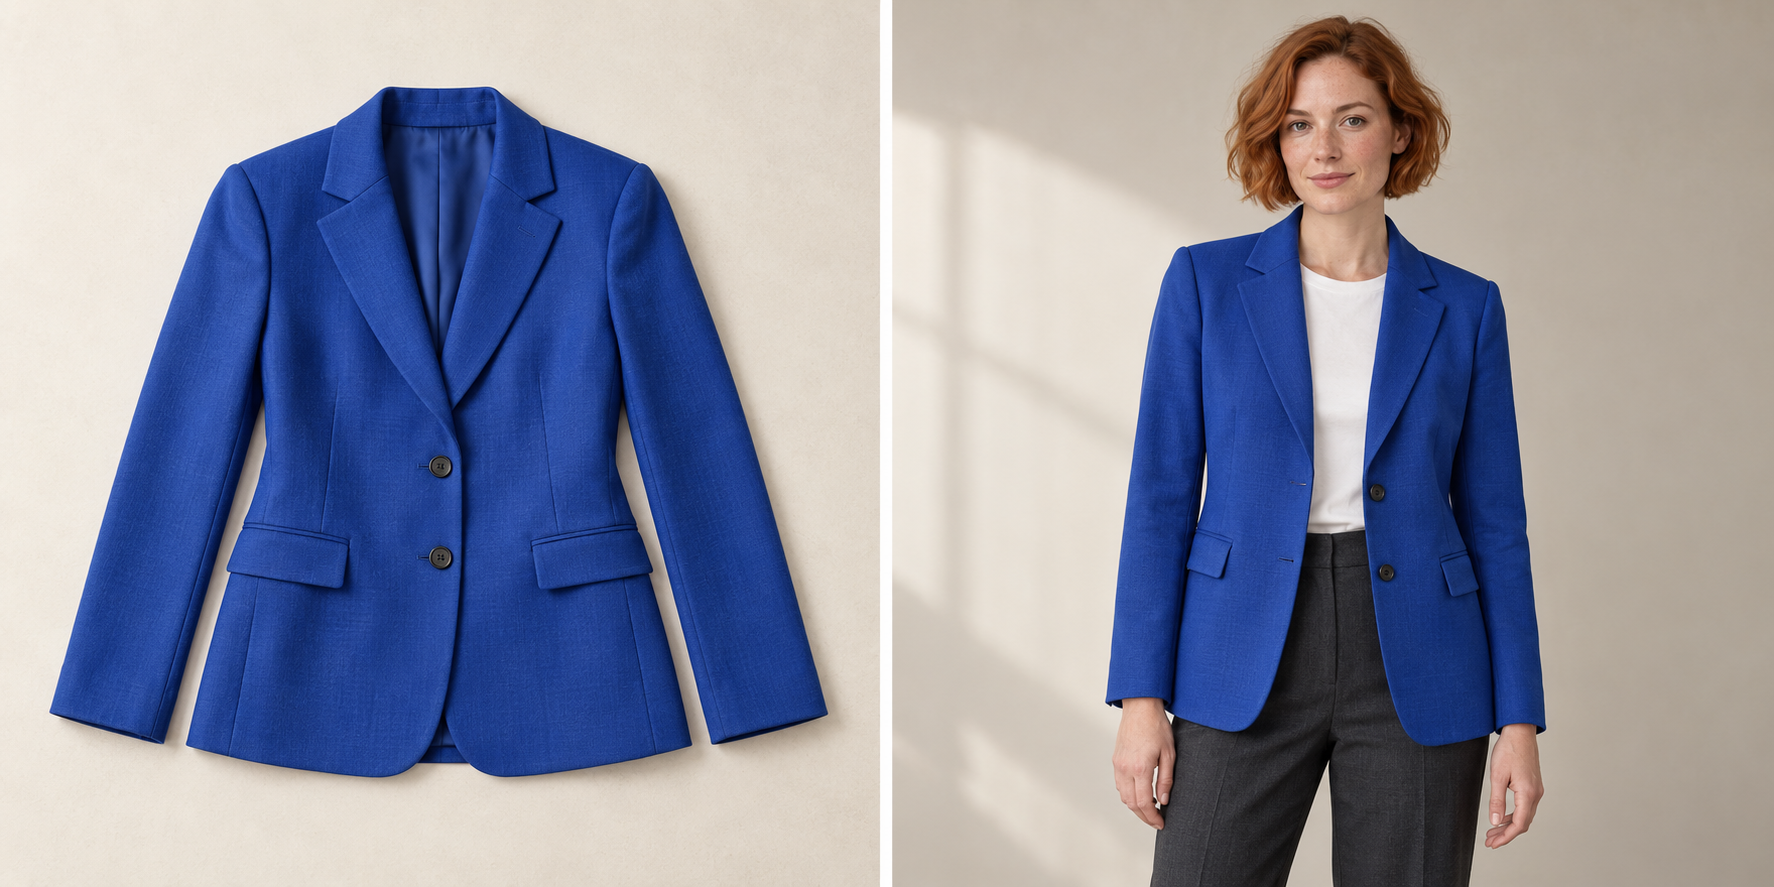
Download the full-resolution outfit reference concept. For a real campaign, replace the fictional garment with approved front, back and detail photography. Keep the same written review procedure. An outfit swap becomes more useful when the reviewer knows which details must remain exact and which are creative choices.
Use three outfit change prompts with a narrow scope
These original briefs demonstrate a garment transfer, a color-only revision and a styling variation. Use the operation that actually accepts the inputs described in the brief. They are prompts to test, not promises that every model can preserve each listed feature.
Use the approved adult creator image for identity, hair, pose, body proportions, framing and studio light. Replace only the visible jacket using the approved garment reference. Preserve its cobalt color, notch lapels, two-button front and flap-pocket placement. Keep the white crew-neck top and charcoal trousers. Keep exposed hands, face and background unchanged. Inspect cuff boundaries and garment contact before approving.
Change only the visible blazer color from cobalt to deep forest green. Preserve the existing cut, neckline, buttons, pocket placement, fabric texture and folds. Keep the same adult creator, white top, trousers, pose, hands, hairstyle, crop and lighting. Do not add accessories or replace the scene.
Keep the approved adult creator and studio framing. Replace the blazer with a plain sand-colored knit cardigan worn open over the same white crew-neck top. Natural knit texture and relaxed sleeves with clear boundaries around the hands. Preserve body proportions, charcoal trousers, hairstyle and light direction. Treat this as a styling concept rather than a specific retail garment.
Download the three outfit prompts. When writing an AI prompt to change clothes, name the region, replacement and invariants. Avoid vague directions such as “make the outfit better.” If the original is layered, specify which layer should change and which layer must stay.
Review an AI clothes editor before accepting the outfit
An AI clothes editor can change details outside your intended region. Compare the original and edited image at equal display size, then inspect the download at native resolution. Start with identity and proportions, then look at the garment construction and finally the contact boundaries. Do not approve a convincing face while overlooking a missing pocket or sleeve merged with a hand.
Download the blank outfit review sheet. It has separate rows for source, garment transfer, color revision and styling variation. Record the reference filename, tool and operation, identity, garment construction, boundaries, background and decision. Every observation field starts empty.
For a real product, reject invented text, changed closures and inaccurate fabric patterns. For a styling concept, label the intended visual direction in your brief and keep the result useful to that task. If the image is meant to help choose a purchase size, use the retailer's measurements and fit information rather than interpreting the generated silhouette as a measurement.
Turn the accepted outfit into a campaign set
Once the outfit change passes review, create a hero portrait, a garment detail and a lifestyle composition with the same identity and visual direction. Keep each image tied to the accepted reference instead of repeatedly using a newly generated variant as the next source. This reduces an uncontrolled chain of visual changes.
For video, start from the approved outfit image and direct a simple movement that keeps the garment readable. Review the buttons, hem and cuffs during the action. A still-image outfit changer and a video clothes editor solve different operations; do not assume the latter exists just because the photo edit worked.
The AI video clothes changer guide separates editing existing footage from animating an approved outfit image, with wardrobe prompts and a review sheet for cuffs, turns and full playback.
Use the AI lookbook guide to organize the set and the image-to-video workflow for the next motion step. In Clout, build an original recurring creator, prepare approved outfit images and generate scenes around that recognizable identity.
Choose the right kind of outfit workflow
| Your goal | Use this approach | Check before approval |
|---|---|---|
| Explore a new creator outfit | Generate a new scene around the same identity reference | Face, proportions and wardrobe description |
| Change clothing in a specific photograph | Select or mask the garment in an image editor | Edges, hands, hair and untouched background |
| Show a particular item from your store | Use clear product references alongside the model reference | Color, seams, print placement and silhouette |
| Check whether clothing will physically fit | Use a sizing or fit service with appropriate measurements | A generated styling image cannot validate sizing |
Adobe's business training material includes replacing clothing with Generative Fill. Its Generative Fill documentation describes selecting an area and adding or replacing objects. That is a local editing workflow. Building a recurring AI fashion creator is a broader identity and campaign workflow.
Build a small reference pack before changing clothes
Start with an approved, well-lit reference of your original AI creator or a person whose likeness you have permission to use. Choose a frame with the face visible and the body area needed for the garment. A waist-up portrait gives too little information for a full-length coat campaign.
For a real garment, supply a front view, a back view when relevant, and a close-up of important details. Record the exact color, neckline, sleeve length, closure and fabric appearance. Keep those details in a written brief so reviewers can compare the result with the product rather than their memory of it.
Separate fixed details from variable details. Fixed details include the creator's identity, apparent age, body proportions and the campaign lighting. Variable details might include the outfit, accessory or location. Change one group at a time so a failed result is easier to diagnose.
A practical outfit change prompt
Use the approved creator reference for the same adult person. Full-length studio portrait, relaxed standing pose, pale warm-gray background, soft daylight from camera left. Style the creator in a cobalt tailored blazer with two buttons and matching straight-leg trousers, white crew-neck shirt and simple white sneakers. Natural fabric folds, accurate seams and realistic sleeves. Keep the face, hairstyle, proportions, pose and framing consistent with the reference.
When editing an existing photograph, limit the selection to the clothing and describe the replacement garment. Protect the face, exposed hands and background through the editor's selection controls. A prompt saying ‘keep everything else’ is useful direction, but the selection is what defines the editing area.
For a product-specific result, add a line such as ‘Use the garment reference for the jacket's shape, color and button placement.’ Inspect the result carefully: reference-guided generation can still simplify a logo or invent a seam.
Create three looks without changing the person
- Approve the baseline: save one identity reference and one campaign framing reference.
- Generate the first outfit: choose the simplest silhouette before trying layered clothing or reflective fabrics.
- Review the garment: compare cuffs, collar, waistline, closures and fabric against the brief.
- Change only the outfit: reuse the identity and scene direction for the next look.
- Compare the set together: review all looks at the same display size, rather than approving each in isolation.
- Expand approved looks: create a close-up, lifestyle scene and short video from the accepted direction.
For a three-outfit launch, a manageable starting set is three full-length images, three detail images and three lifestyle images. This nine-asset example is an editorial planning template, not a claim about how many generations a tool requires. Save rejected variants separately so they do not become accidental references.
Fix the common failures
| What went wrong | Likely cause | Next change to test |
|---|---|---|
| The face looks different | Too many identity and scene changes at once | Return to the approved identity reference and simplify the pose |
| A sleeve merges into the hand | An ambiguous edge or complicated gesture | Use relaxed visible hands and a clearer garment selection |
| The product color is inaccurate | Creative lighting changed its appearance | Use neutral light and compare against the product reference |
| The outfit changes between assets | The written brief lacks garment specifics | Repeat the exact garment description and reference |
| The jacket logo is distorted | The model reconstructed lettering | Use a controlled retouch or real product detail shot |
Publish styling imagery with accurate claims
A generated image can communicate an outfit concept. It cannot establish real fit, fabric performance, sizing accuracy or how the garment behaves on a customer's body. Keep real product photography available for the details that determine a purchase, and follow the disclosure requirements of the channel you use.
In Clout, build the recognizable creator behind the campaign and generate photos and videos around that identity. Use the AI lookbook workflow to organize a full set, then review each asset against your garment references. Create your fashion campaign creator and start with one approved look.