An AI video clothes changer helps you explore a different wardrobe in a moving scene. The first decision is whether you need to edit a particular recording or generate a new fashion clip. These jobs can look similar in a thumbnail, but they have different requirements for movement, timing and garment accuracy.
This guide gives you a practical workflow for both routes, three original prompts and a blank temporal review sheet. The example artwork shows a fictional creator wearing a forest-green cardigan in a fashion studio. It is an illustrative production reference, not a before-and-after video result or a measured tool benchmark.
Choose an existing video edit or a new outfit scene
If your existing performance matters, choose an operation that accepts a source video and allows the intended wardrobe edit. If you are developing a new creator campaign, approve the outfit in a still image first, then animate a restrained action. Do not treat a newly generated performance as an exact reproduction of a recording.
| Your requirement | Starting material | Operation to look for | Main review |
|---|---|---|---|
| Recolor a cardigan in a recorded shot | The original short clip | Video editing with a written instruction | Color, skin boundaries and source timing |
| Replace an outfit while using source movement | A reference clip and approved wardrobe references | A documented outfit or object swap operation | Garment construction, identity and movement |
| Create a new fashion creator video | An approved outfit image | Image to video | Identity, cuffs, hem and continuity |
| Change clothing in a photograph | A person image and garment reference | Still image editing or garment transfer | Static seams, fit and boundaries |
For the last route, use the AI clothes changer guide. Finish that still-image review before moving into video. An image editor that changes a jacket in a portrait does not automatically provide an existing-video clothes editor.
What documented video clothes editing tools support
The official xAI video editing documentation describes editing an existing video with a prompt and includes an outfit-color example. Its documented API accepts an MP4 source up to 8.7 seconds. The output inherits the source duration and aspect ratio, with matching resolution capped at 720p. Separate duration, aspect-ratio and resolution controls are unsupported for that editing operation. Check the actual endpoint rather than applying these limits to every Grok consumer interface.
Higgsfield's Genjutsu page describes Object Swap for selected elements including outfits, and Motion Transfer for carrying reference movement into a rebuilt scene. Its FAQ lists a 4–30 second reference video and up to 30 reference images. Those are documented provider capabilities, not proof that an individual wardrobe edit preserves every frame. The Genjutsu guide covers the wider operation choice.
These routes are useful starting points to investigate when you want to change clothes in video with AI. Compare the current operation, supported inputs, export conditions and charge in your account before submitting a job. We have not run a comparative wardrobe-replacement benchmark for this article.
Prepare a source that makes the outfit readable
Choose a short continuous shot with one clearly visible adult subject. A stable camera and a modest gesture make it easier to isolate the clothing change. A jacket hidden behind crossed arms, a fast spin or repeated cuts makes the brief harder to evaluate. Keep the original file so you can compare timing and detail later.
Write down the specific garment characteristics you need: neckline, closure, sleeve length, texture and color. For a real product, use approved garment photography showing those features. A vague request for a fashionable jacket invites the model to invent construction. A reference does not certify sizing, fabric behavior or the accuracy of an ecommerce product depiction.
Our fictional studio example uses a green knit cardigan over a cream top with charcoal trousers. The easiest revision changes only the cardigan color. Replacing it with a structured cobalt blazer is a larger task because the collar, front opening, cuffs and silhouette must change. Test those briefs separately so you can identify the source of a failure.
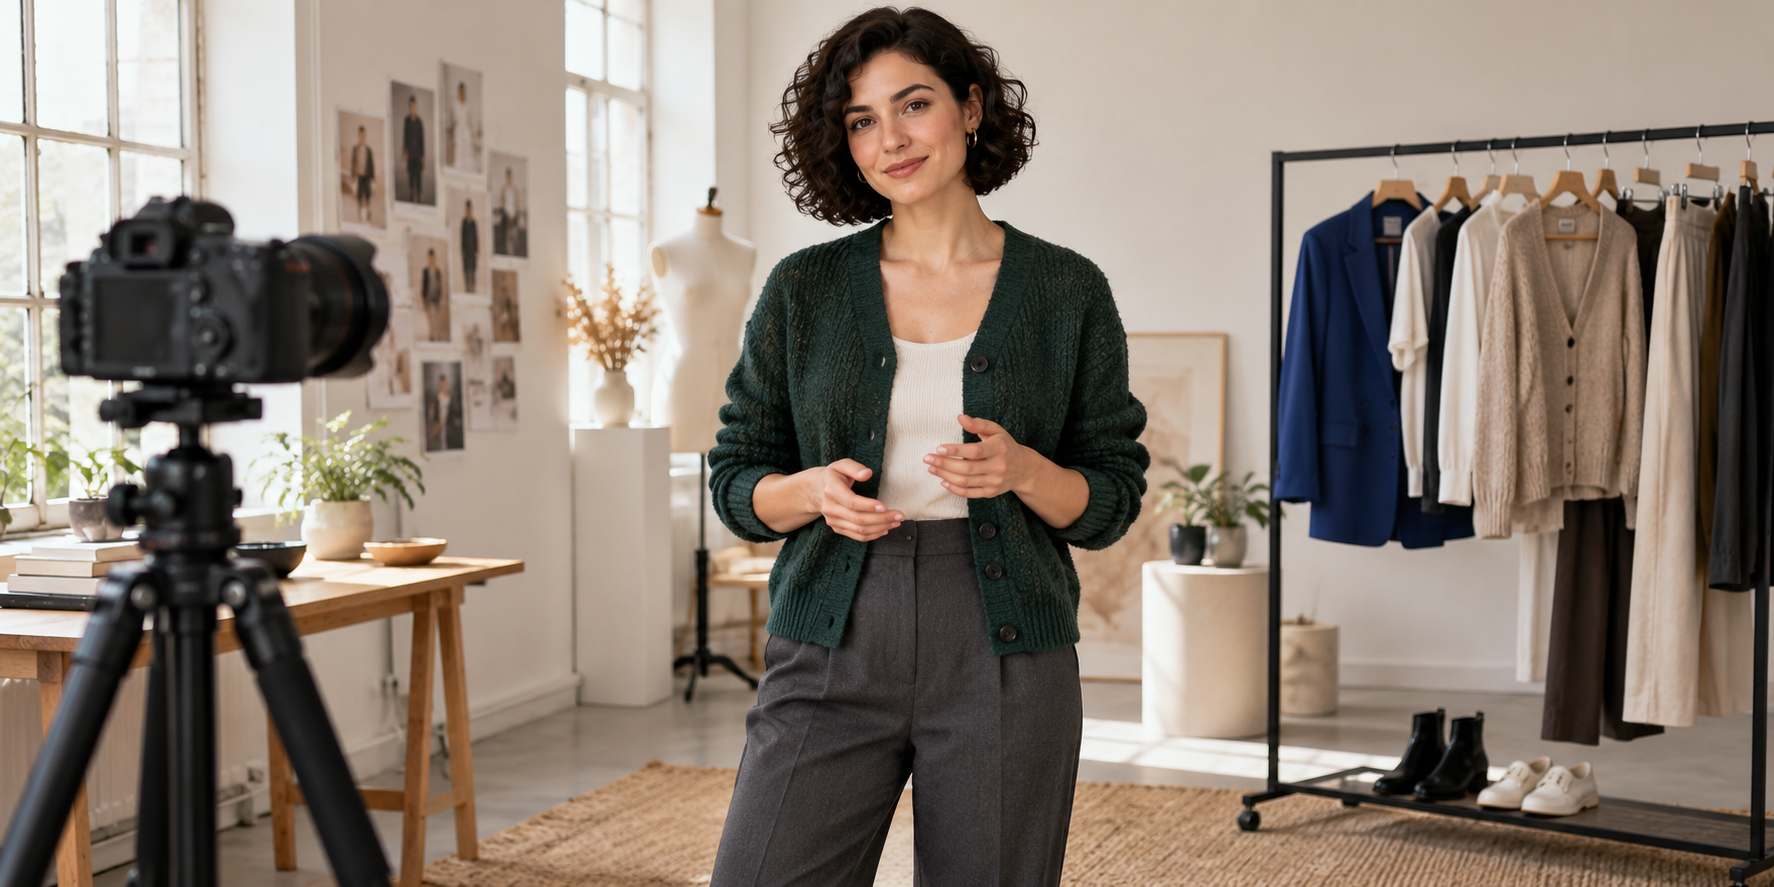
Download the original fashion scene reference. It can help you practice writing a scene brief. It is not a clean garment-only reference or an exact specification for a manufactured cardigan.
Change clothing in an existing video step by step
- Select the editing operation and confirm that it accepts a source video rather than merely animating an image.
- Upload the original clip within that operation's supported length and format. Check its displayed orientation and subject.
- Define one wardrobe change and identify the subject unambiguously. Supply garment references only when supported.
- Name the invariants such as face, hairstyle, hands, cream top, trousers, studio and camera framing.
- Generate a short test and save the prompt, input filenames and operation name alongside the export.
- Compare source and output at matched timestamps, then watch uninterrupted playback before approving the edit.
“Preserve everything else” is a useful instruction, but it is not evidence that everything stayed unchanged. Compare the facial expression and hand contact as carefully as the garment. If the source contains speech, review the exported audio, timing and mouth movement instead of assuming that a visual edit preserved the original performance.
Animate an approved outfit image for a new campaign
For a new fashion scene, start with the creator wearing the intended outfit in an approved image. This resolves the wardrobe before adding motion. Direct one small action, such as a glance toward camera or a gentle turn, with enough visibility to inspect the sleeves and front closure.
Keep the accepted still as the reference for later scenes. Repeatedly using a newly generated frame as the next identity source can accumulate unintended changes. Organize the campaign with the AI lookbook guide and use the image-to-video workflow for the motion stage.
This route produces a new clip. If you need a particular person to say a particular recorded line with the same gestures, decide whether generated reinterpretation is acceptable before using it as a substitute for source editing.
Three original prompts for wardrobe video tests
These are creative briefs to adapt, not completed generation results. Use the editing prompts with your own suitable source clip. Use the animation prompt with an approved still. Replace wardrobe details to match your actual reference and avoid naming an input you have not supplied.
Prompt one for a restrained color edit
Edit the supplied video. Change only the adult creator's forest-green cardigan to a muted cobalt blue. Preserve the existing knit texture, buttons, neckline, sleeve length and fit. Keep her face, dark curly bob, hands, cream top, charcoal trousers, studio background, camera framing and action timing unchanged. Keep the color consistent through the entire shot without tinting the skin or background.
Prompt two for a supported outfit replacement
Use the supplied clip as the movement reference and the approved blazer images as the wardrobe reference. Replace only the adult creator's cardigan with the referenced cobalt blazer. Follow the reference collar, front opening, cuffs and fabric appearance. Preserve her identity, hairstyle, cream top, trousers and studio scene. Maintain coherent sleeves as her hands cross the torso and keep the blazer stable through the turn. One continuous shot without an added cut.
Prompt three for a new image-led fashion clip
Animate the supplied approved outfit image into one continuous medium shot. The adult creator makes a small glance toward camera, gently turns a few degrees and settles into the starting pose. Keep her dark curly bob, green cardigan, cream top and charcoal trousers recognizable. Preserve the cardigan buttons, cuffs and hem throughout the action. Soft studio daylight and a locked camera. No wardrobe transformation, added text or new people.
Download all three video wardrobe prompts. The second brief depends on a tool that supports the required video and garment references. A prompt alone cannot enable an unsupported input or operation.
Review clothing throughout the motion
Inspect at least the opening, a hand crossing the garment, a turn and the ending. Then watch the clip at its intended playback speed. A stable opening frame can hide flicker, a disappearing button or a sleeve that merges into the wrist halfway through the gesture.
| Moment | Inspect | Reason to revise |
|---|---|---|
| Opening | Identity and complete garment construction | Wrong collar, changed face or missing closure |
| Hand crossing | Cuff, wrist and fabric boundary | Skin recolored or garment attached to fingers |
| Turn | Side seam, shoulder and silhouette | Pattern shifts or sleeve length changes |
| Ending | Outfit compared with the opening | Buttons, color or hem no longer match |
| Full playback | Temporal continuity, timing and audio | Flicker, unrequested cuts or an altered performance |
Download the blank video clothes review sheet. Its observation and decision fields are empty. Record the timestamps and actual defects in your own render; no success rate or quality score has been prefilled.
Fix drifting sleeves and unintended changes
If a cuff changes when the hand crosses the torso, try a simpler source action or a smaller edit region where the tool supports selection. If a printed pattern moves independently of the fabric, reject the clip for product-accuracy work. Reducing motion can help diagnose the problem, but it does not prove the model can reproduce the original garment.
If the face changes, check whether multiple reference people or a large head turn compete with the identity brief. If the background shifts, check that you selected an editing operation and explicitly described the unchanged scene. Keep the rejected result and revise one major variable at a time so the next test has an interpretable purpose.
When export resolution is lower than your source, plan around that output limit. Upscaling does not recover a missing button or correct a deformed sleeve. The Grok image and video guide can help separate generation from editing before your next test.
Build a recognizable fashion creator campaign
In Clout, create an original fashion character and build photos and video scenes around the same recognizable identity. Approve the wardrobe direction, keep a reference set for the campaign and give each clip a concrete action. This connects a lookbook, product scene and social video through the creator your audience recognizes.
Use an existing-video editor when that is the required operation, and bring accepted results into your campaign workflow. Keep the approved reference, final export and review decision together so your next outfit scene starts from a documented visual brief.