

For the listener response after a discovery, use the reaction-shot planning guide and its original fictional clerk illustration.
What an eyeline match means in film
An eyeline match connects a shot of a character looking with a shot of the object or person they appear to see. The edit lets the audience infer a spatial and dramatic relationship. The Columbia Film Language Glossary defines it through that look-to-object connection. The word match refers to how the views work together, not to two faces having identical eye positions on the screen.
For an AI drama, this is a useful way to reveal information without making one generation perform every action. You can plan a look, a detail and a response separately. The challenge is making them describe the same place and event after assembly. This guide supplies an original schematic example and a review process; it does not claim that a model has passed the example.
Start with the information the look should reveal
Our original scene is The Blue Card. A small fictional courier robot notices a card on a desk. The card says ROOM 8. The scene changes from an unexplained glance to a specific destination. Keep that one piece of information fixed before changing the visual style, cast or camera treatment.
The look has a target below the robot's eye level and toward its screen right. The detail shows the card on the established desk. A return view would let us read the response. Without the target shot, the glance is ambiguous; without a useful look, the card can feel like unrelated coverage.
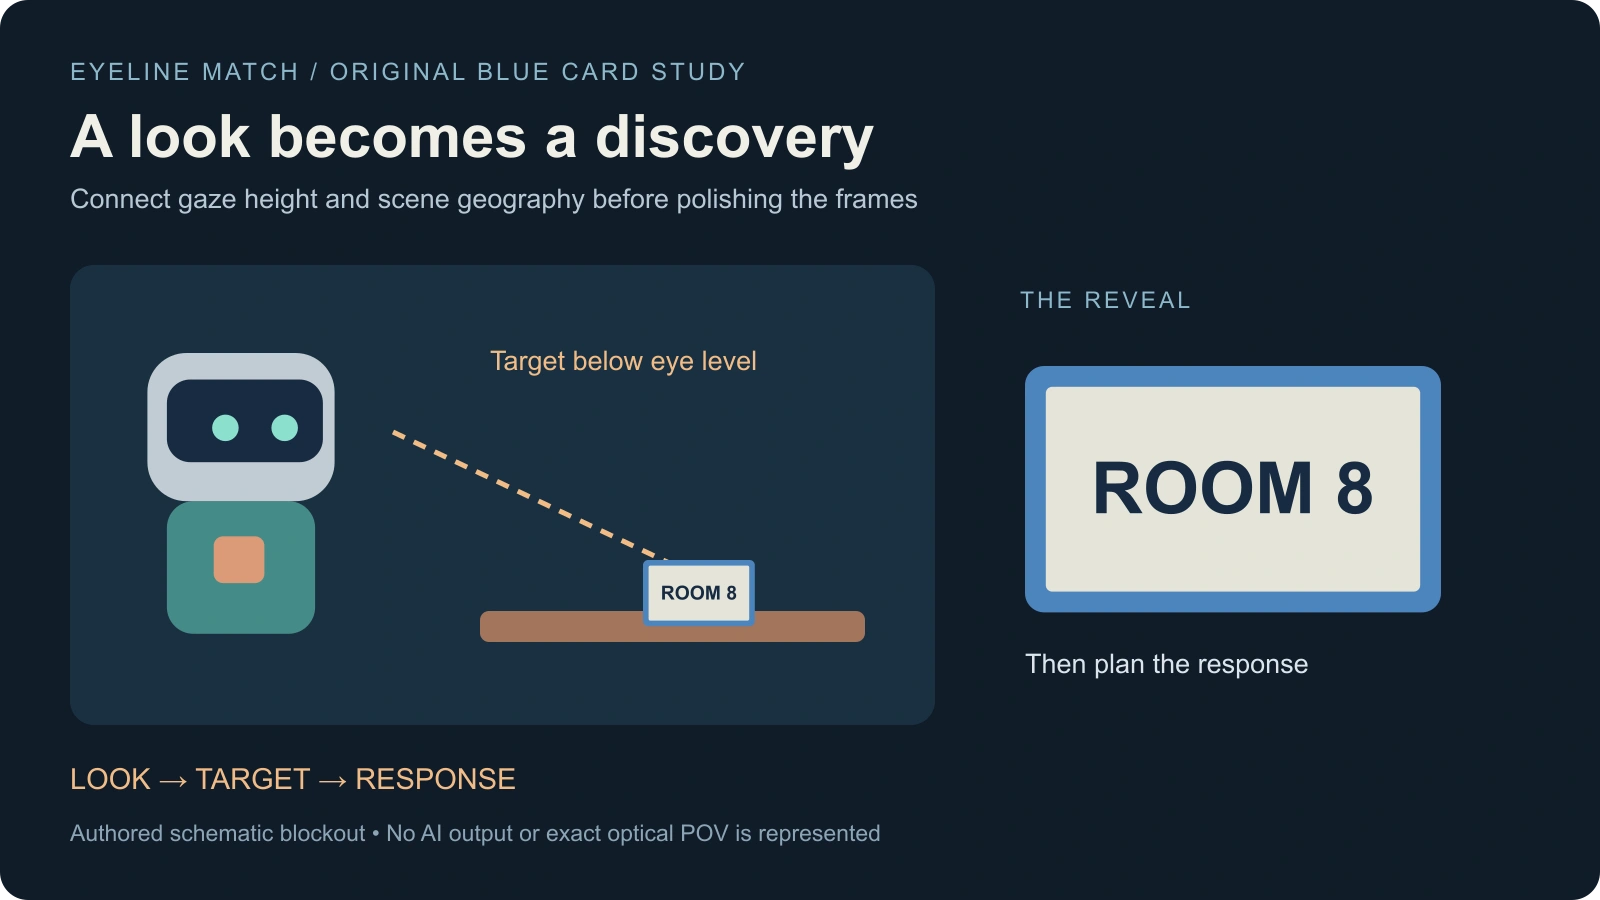
This original editorial diagram is a blockout of intended relationships, not photographed footage or AI output. Its arrows explain the planned gaze. They are not meant to appear in a finished drama, and the illustration is not an exact optical point-of-view simulation.
Record the gaze and target before generating shots
| Decision | Blue Card plan | Review question |
|---|---|---|
| Target | Blue card marked ROOM 8 | Is the revealed detail the intended object |
| Gaze direction | Down and toward screen right | Does the look lead plausibly to the desk |
| Target height | Below the eye line on a desk | Does a low target follow a downward look |
| Scene geography | Robot left of desk and card | Do the views still describe one room |
| Dramatic result | A destination becomes readable | Can a viewer understand the discovery |
Write target identity independently of gaze. A technically plausible glance can still reveal the wrong prop. Likewise, the correct card does not rescue an upward look when the established card lies below the character. Review direction and meaning together.
For a conversation, add each person's height and which side of the camera their partner occupies. The multi-shot coverage guide handles the broader camera plan. Use the eyeline record for the specific look-to-target relationship inside that plan.
Eyeline match versus POV and shot reverse shot
| Term | Question it answers | Blue Card example |
|---|---|---|
| Eyeline match | What does this look connect to | Robot looks then card is shown |
| Point-of-view shot | Whose visual position does the camera approximate | A card view designed from the robot's position |
| Shot reverse shot | How does coverage alternate between participants | Robot and another character exchange views |
| Graphic match | Which visible shape or composition links the images | Two rectangular cards share a composition |
A target shot can establish what a character sees without reproducing their eye position exactly. Decide whether you need a strict subjective viewpoint or a readable detail. Do not describe a neutral card insert as a measured optical POV merely because it follows a glance.
Eyeline matching also sits within continuity editing. Adobe's continuity editing overview discusses techniques that ground viewers across separate shots, including eyelines and the 180-degree rule. For this exercise, preserve the agreed camera side and target location rather than applying an automatic left/right flip to every image.
Prepare three short shot briefs for an AI drama
Look brief — An original courier robot stands beside a desk in a quiet archive. Its attention settles down and toward screen right on the established card. Keep the same body, head markings, desk position and lighting. Hold the ending so the look can motivate the cut.
Target brief — Show the accepted blue card on the same desk, preserving its border, orientation and position relative to the surrounding objects. Leave a clear area for the exact ROOM 8 lettering. If the selected generator changes the text, use a controlled graphic or compositing step for the final lettering.
Response brief — Return to the accepted robot and room. Its attention remains connected to the desk before a small response. Keep the change in behavior simple enough to read. These are creative directions, not tested API payloads or guarantees of precise timing.
Prepare the cast and environment in Clout AI Cinema and use the supported image or video operation for each shot. Check the available reference controls, duration and quote in the selected workflow. Clout does not need to be presented as a guaranteed automatic eyeline repair tool for this production method to be useful.
Cut the look and target before polishing the response
Place the look before the card and watch them at the intended delivery size. Ask someone to identify what the character noticed without first giving them the synopsis. This is a practical comprehension check, not a scored model benchmark.
Try moving the cut earlier or later within usable handles. Cutting before attention settles can weaken the connection; holding too long after the discovery can change the pacing. There is no single prescribed frame count. Preserve the full source takes so the editorial decision remains reversible.
For an object detail that needs to be readable in the final edit, continue with the insert-shot workflow. That guide focuses on prop identity, framing, text and incoming/outgoing continuity. The two techniques can work together while answering different production questions.
Diagnose a broken match by the smallest cause
- Wrong direction — Recheck the accepted look and target placement before regenerating the whole scene.
- Wrong height — An upward glance and a tabletop reveal need a motivated explanation or a revised look.
- Wrong object — Compare the card border, label and orientation to the approved prop reference.
- Unclear geography — Use a master or simpler target composition to re-establish the relationship.
- Unreadable meaning — Review the actual card at phone size and preserve enough time to read it.
A horizontal flip can change text, clothing asymmetry and scene geography. Check those consequences before using a flip as a repair. When a shot has several defects, retain the accepted references and change one variable at a time so the next review can explain what improved.
Download the eyeline brief and continuity sheet
Use the Blue Card eyeline brief and blank continuity review sheet. The file records intended target, gaze, height, camera side and the actual take decision. Empty result fields are deliberate; no paid generation or viewer test is represented.
For a longer scene, connect this review to the AI short drama workflow and previsualization plan. If you need an uninterrupted view rather than a look-to-target cut, use the continuous-scene planning guide. Choose the form that makes the discovery understandable.


