

A good portrait can be the wrong shape for a campaign banner. Cropping closer removes the workshop, stretching distorts the person and enlarging the file adds no new scenery. AI outpainting addresses the missing space by generating a continuation outside the original frame.
The important choice is whether you need the original subject to remain pixel-for-pixel unchanged or only want a visually related wider composition. Those are different production requirements. This guide explains both, with original downloadable images and an honest review of what changed in our example.
What AI outpainting changes
OpenAI's original outpainting explanation describes continuing an image beyond its borders while considering existing shadows, reflections and textures. That establishes the operation; the 2022 announcement is not evidence of current product access or billing.
Imagine a ceramic artist holding a bowl. Outpainting can add more window, workbench or shelving around the artist. Inpainting repairs or replaces a selected area inside the picture. Background replacement changes the setting behind the subject. Upscaling increases image resolution. A simple crop removes content. Choose the operation that solves the actual problem instead of treating every AI edit as the same task.
| Job | Useful operation | What to inspect |
|---|---|---|
| Need wider scenery | Outpainting | New edges and connection to source |
| Need a different room | Background replacement | Subject edges and new lighting |
| Need a small local repair | Inpainting | Selected area and surrounding seam |
| Need a larger file | Upscaling | Detail rather than new composition |
| Need a new arrangement | Reference-based regeneration | Entire subject and setting |
Original source and generated expansion
We created an original fictional adult ceramic artist in a sunlit workshop, then supplied that image as a reference for a wider edit. These are actual generated files rather than stock images chosen to look like a before-and-after pair. The square source is 1254 by 1254 pixels and the wide result is 1672 by 941 pixels.

Download the original square source
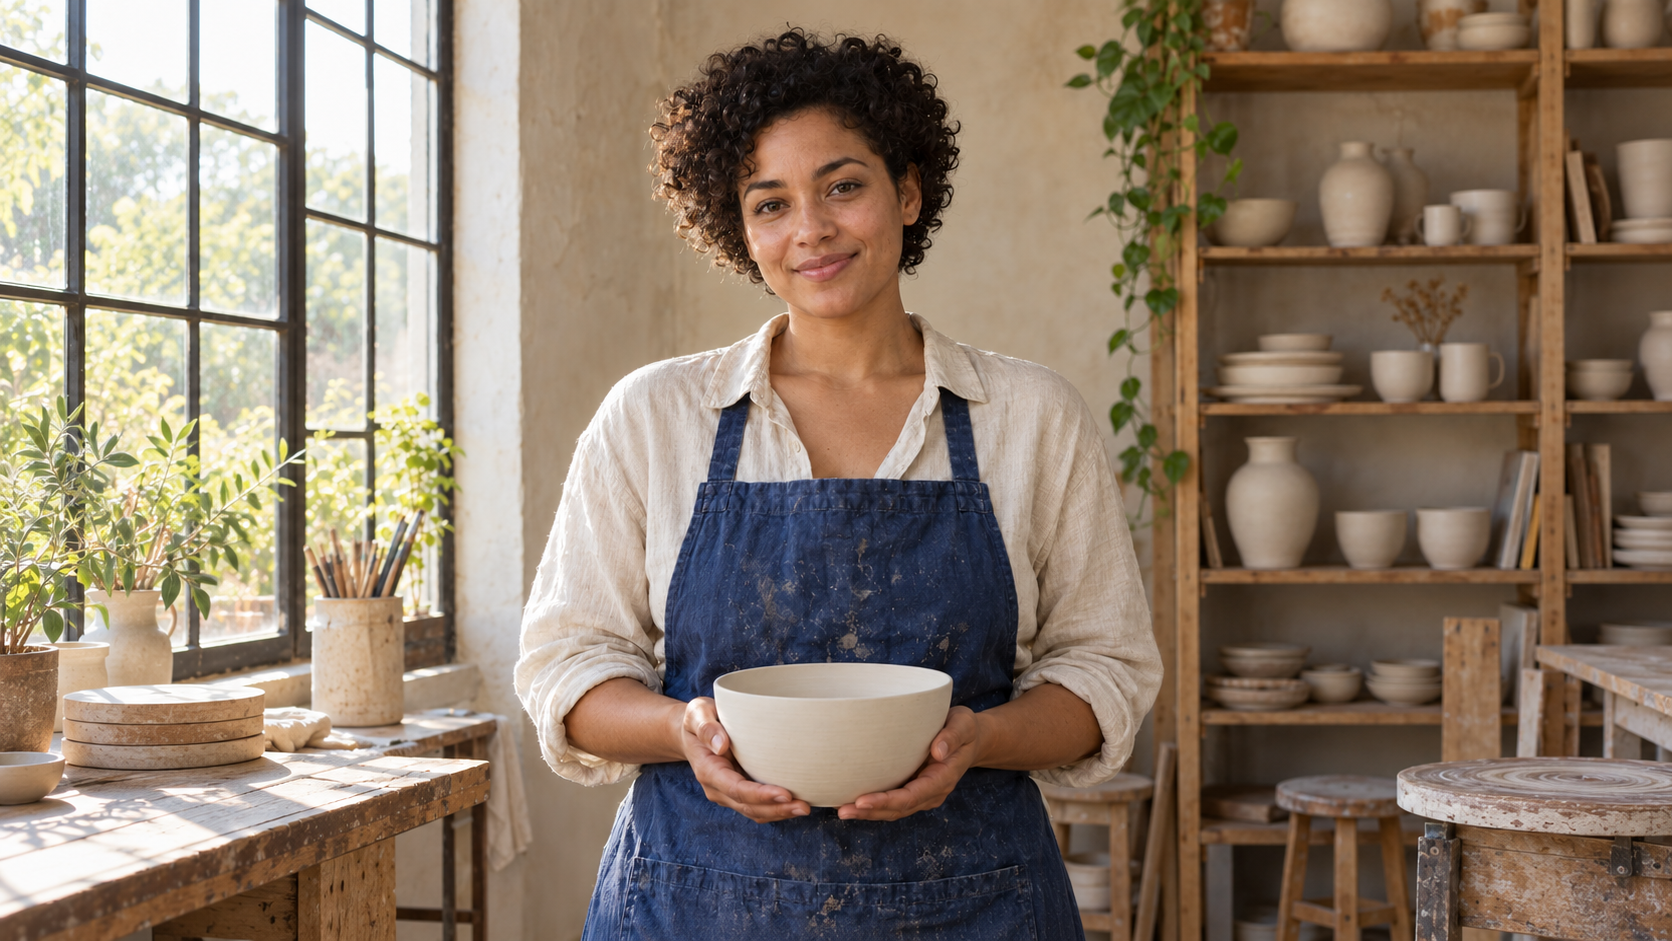
Download the wide expansion
The result carries the blue apron, cream shirt, ivory bowl and left-side daylight into a broader workshop. It adds window and bench space on the left and more pottery shelving on the right. However, the face, fingers and bowl are subtly reinterpreted. This is a generative expansion example, not proof that a protected center remained unchanged. The different native dimensions also mean the source was not simply pasted into a larger canvas at its original pixel size.
Both downloads use lossless WebP encoding. We verified that each WebP preserves the decoded pixels of its own generated PNG master. That check concerns file encoding; it does not mean the wider generation preserves the square source's pixels. Save the direct file rather than a screenshot when comparing details.
Plan the final frame before generating
Start with the actual placement. A wide article header needs a different composition from a vertical creator story. Record where the subject should sit, what must remain visible and whether you need space for a headline. Do not add a second person or a dramatic new object simply to fill an empty edge.
Download the editable outpainting framing plan. It contains four example briefs with target shapes and review priorities. The protected-region requirement, actual output dimensions, review decision and notes are left blank for your project. The listed shapes are creative planning suggestions, not platform specifications or guaranteed generation sizes.
For the workshop example, the brief calls for more environment while keeping the artist and bowl central. A campaign with copy on the left would need a different instruction: move the compositional emphasis toward the right and keep the left background quiet. Review the final copy placement in your design editor; an attractive empty area may still have too much contrast for readable text.
Write a concrete image expansion prompt
Expand this square workshop image into a wide composition. Continue the sunlit window and workbench on the left and the timber pottery shelving on the right. Keep the same adult ceramic artist, blue apron, cream shirt and plain ivory bowl. Match the daylight direction, warm plaster walls and photographic texture. Keep the full head, both hands and bowl visible. Add believable workshop space with no extra people, no logos and no lettering.
This is an original reusable brief based on our demonstration, not a command that guarantees a specific editor will lock source pixels. If your editor has a protected area or generation mask, use that control as well. Asking to keep the same face is weaker than preserving the original face outside the editable region.
Describe the continuation rather than rewriting every detail of the original. A request for a new expression, outfit or dramatic lighting can conflict with preservation. If those changes are intentional, treat the output as a new campaign image and approve it accordingly. When the first attempt invents clutter, reduce the requested additions and simplify the background.
Choose preservation or creative regeneration
The official getimg outpainting page distinguishes a mode that keeps original pixels from a Smart Resize mode that regenerates the whole image. That distinction is useful when comparing editors. Verify the behavior of the actual mode you select; a feature name alone does not prove source fidelity.
For an approved product packshot or a real portrait that must stay unchanged, choose a workflow with protected source pixels and retain an untouched master. For an imagined creator scene where a related composition is acceptable, a reference-based wider generation may be useful. Our example demonstrates the latter and shows why reviewing the center matters.
Do not use a regenerated label as proof of what is printed on a product. If the product needs exact packaging, keep the approved packshot through a compositing workflow or reject the altered result. For creator identity, compare the actual facial features across the source and expansion rather than relying only on matching hair or clothing.
Review the center as carefully as the new edges
| Area | Review question | Workshop example |
|---|---|---|
| Face | Does the identity still match | Recognizable appearance but subtle facial reinterpretation |
| Hands and object | Is the grip believable and the item accurate | Similar two-hand bowl pose with small regenerated differences |
| Lighting | Do shadows follow one coherent direction | Left-side daylight continues into added scenery |
| Geometry | Do benches shelves and windows connect | New workshop structure needs full-frame review |
| Final placement | Are subject and planned text visible | Wide scenery adds room but copy still needs layout review |
Inspect the full-resolution source and output beside each other, then inspect the final placement at phone size. The first review catches changed fingers and repeated shelf objects. The second catches cropped faces and unreadable headlines. Passing one does not substitute for the other.
If the edge looks plausible but the source changes in an unacceptable way, reject that attempt. Use a protected-region workflow or narrow the edit. If preservation passes but the new wall is repetitive, revise only the generated area. Keep rejection notes so the next brief addresses the actual failure.
Turn an approved image into a creator campaign
A wider frame is useful when it makes the story clearer: a maker in a workshop, a presenter beside a demonstration or a creator in a recognizable setting. Start with an approved identity and a small set of connected scenes rather than expanding every image indiscriminately.
Create your campaign creator in Clout and generate coordinated photos and videos around that character. Keep the approved reference and review each new scene before publishing.
Image expansion also does not solve video outpainting. A moving clip needs consistent generated borders across frames and camera motion. The still-image example here cannot establish temporal stability, so evaluate that as a separate video workflow.


