

A good sketch-to-video sequence keeps the idea that made the drawing work. The fox should retain its pointed muzzle, the satchel should stay on the same side, and a small wave should not turn into an unrelated walk through a new city. Start with a clear visual anchor and give each shot a single job.
This guide uses an original fox courier as the planning example. Download the first frame, try the motion briefs and compare your actual output with the reference. The image is finished artwork; the briefs are production directions rather than claims that a particular model has passed a benchmark.
For a complete sequence, use the AI storyboard guide with four example frames and an editable board to plan the order before generating individual clips.
Download the original fox courier first frame
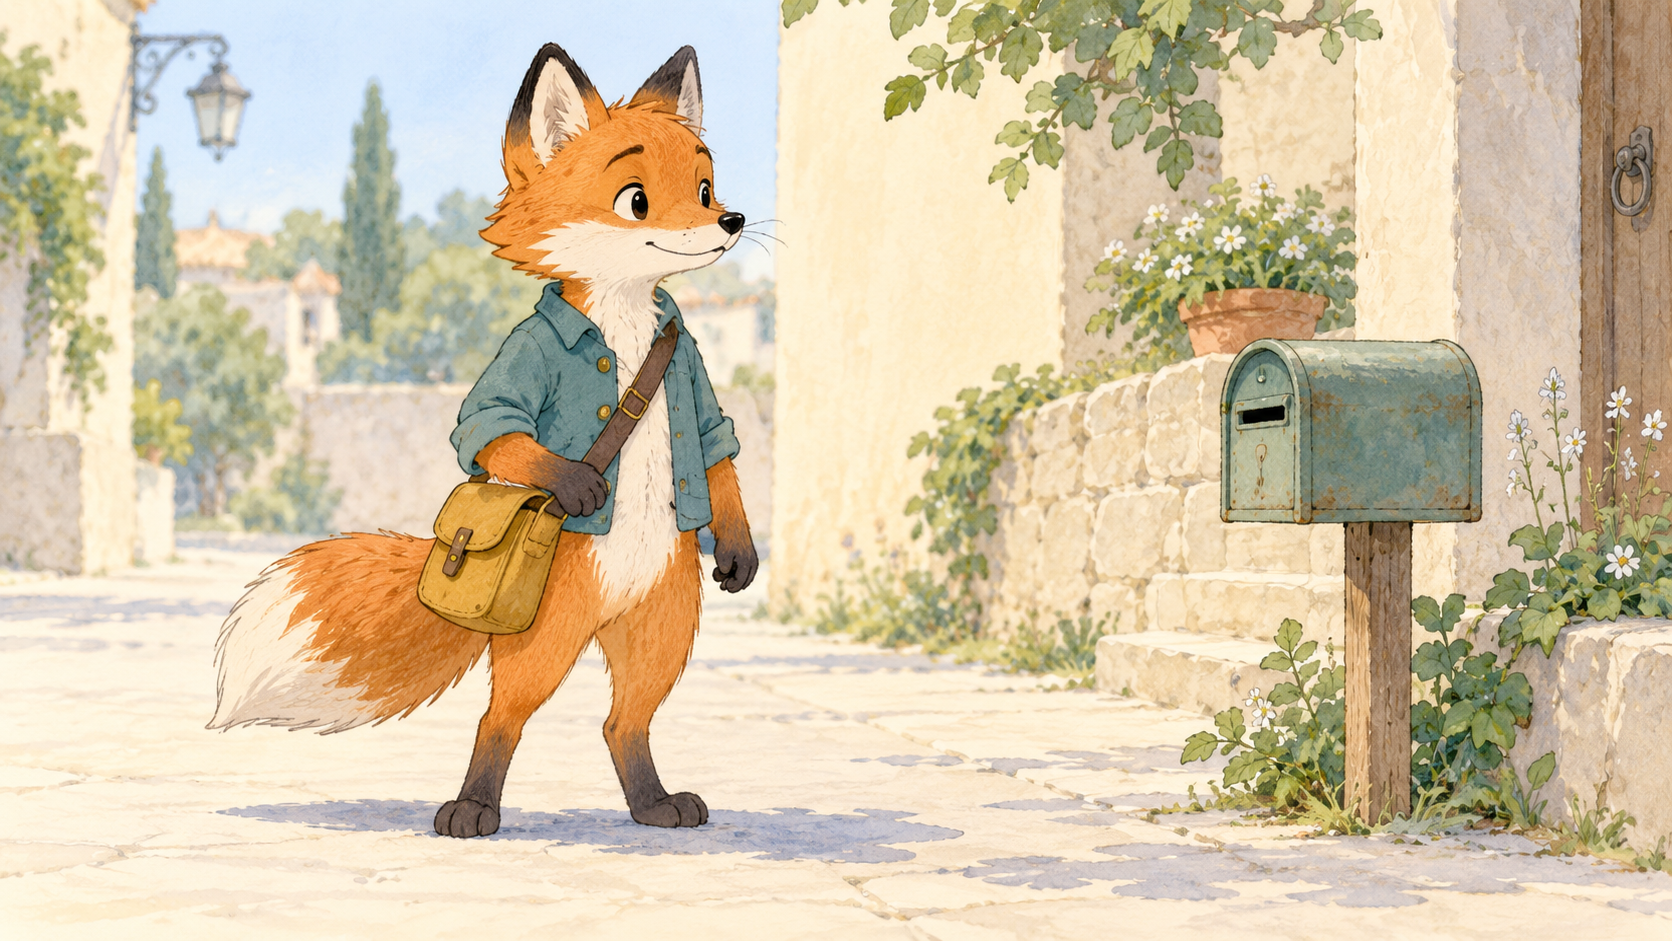
Original AI-generated illustrated first frame for the examples below. Keep the charcoal ear tips, pointed white muzzle, teal jacket and hip satchel in your reference notes.
Download original image (1672 × 941)Use the full-resolution file as your starting image. Avoid uploading a screenshot of this page: the screenshot can include a crop, interface elements and fewer usable pixels. Keep the original file beside the accepted video so you can compare the character after generation.
Choose which sketch animation job you need
| Job | Starting material | Useful first output |
|---|---|---|
| Animate one drawing | One approved illustrated frame | One short character gesture or camera move |
| Build an animatic | Several numbered storyboard panels | An edited sequence that proves timing |
| Transfer a performance | A character image and suitable motion reference | A movement study based on that reference |
| Restyle a rough sketch first | An unfinished composition or doodle | An approved still before animation |
For one drawing, an image-to-video route is a practical starting point. Runway's official guide distinguishes the image's visual information from the prompt's motion direction. Its documented workflow supports that division of the brief; you still need to inspect how your drawing behaves.
Higgsfield's sketch-to-video page describes animation from drawings and storyboards. Its current description distinguishes preparing a start frame from animating it and describes assembling individual storyboard clips into an animatic. For performance transfer, its Wan Animate page instead describes supplying a character image and a reference motion video. Choose the route by the inputs you actually have.
Prepare a drawing that survives motion
Give the subject breathing space. Keep ears, feet, tail and props away from the crop. Remove scanner shadows, desk edges and accidental marks when those are not part of the scene. Retain deliberate pencil texture if that texture defines the style.
Check the silhouette at phone size. Separate an arm from the torso and a satchel strap from the jacket so the action is readable. A tangled pose gives an animation model an ambiguous starting point. If you need a clearer pose, finish that still first and approve it before spending time on video.
Write a short identity record: charcoal ear tips, white pointed muzzle, teal jacket, mustard satchel at the hip shown in the reference. For a recurring character, reuse the accepted design rather than regenerating the starting drawing for every shot. The AI drawing generator guide covers that preparation step in more detail.
Start with one small gesture
Animate the supplied fox courier drawing. The courier lifts the right paw in a small friendly wave, pauses, then lowers it. Keep both feet planted and the mustard satchel at the hip shown in the reference. Preserve the graphite outlines, watercolor texture, charcoal ear tips and pointed white muzzle. The camera stays still. The mailbox and pale street remain unchanged. No new objects, written text or scene cut.
A wave gives you a clear acceptance test: the paw moves while the design remains recognizable. Watch the strap and jacket edge during the gesture. If the paw merges with the chest, simplify the pose or prepare a more separated starting arm position.
Test a camera move separately
Make a gentle camera push toward the fox courier in the approved drawing. The courier remains still with a natural relaxed posture. Keep the same watercolor fills and graphite line texture, with ears, muzzle, jacket and satchel unchanged. Maintain the mailbox position and stable street geometry. One continuous restrained move without a new background or character action.
Compare this with the gesture shot. Combining a walk, wave, moving camera and changing background in the first request makes failures harder to diagnose. Approve the simpler motion first, then add complexity deliberately.
Plan a short delivery story with three shots
| Shot | Action | Continuity to retain |
|---|---|---|
| Introduction | A small greeting beside the mailbox | Face, ear tips, jacket and satchel |
| Delivery detail | A separate close view of a plain envelope | Paw style, envelope shape and watercolor treatment |
| Finish | Courier settles beside the same mailbox | Original location and character design |
Create a suitable accepted first frame for the envelope detail rather than asking the wide illustration to invent a close shot, reach into the bag and change viewpoint at once. The original wide image does not fully describe the inside of the satchel or every possible paw pose.
For a storyboard animatic, number the panels and write the intended duration of each beat before generation. Animate each panel as a shot, then arrange the clips in an editor. A sequence assembled from approved clips gives you control over the pause before the delivery and the hold on the final expression.
Keep reference motion distinct from a text brief
If you already have a suitable original or authorized performance video, a motion-transfer workflow can be the relevant choice. Match the framing and visible body parts to the character reference. A full-body performance asks more of a drawing that only shows a face.
Inspect the transfer rather than assuming the reference guarantees an exact result. Watch foot placement, prop contact and how the illustrated anatomy maps to the performance. Use a small motion study before a long sequence. Keep this test separate from the prompt-driven wave so you can judge the workflow you chose.
Review the actual video before adding sound and captions
- Compare the opening and ending frames with the approved drawing
- Play the full clip for changing outlines, flicker and morphing props
- Check limbs, face and contact with the ground during the action
- Confirm that the ending can connect to the next shot
- Add narration, caption timing and final sound in the edit as needed
Write a precise rejection note: “the strap changes shoulders during the wave” or “the mailbox bends during the push”. Revise the action or first frame that caused the issue. Do not replace the entire creative direction when one element needs correction.
Keep captions away from the fox's face and hands, and review the final export at the target aspect ratio. Do not assume a landscape clip can be cropped to portrait without losing the satchel or mailbox. Plan a separate portrait composition when those details carry the story.
Build a character you can bring back
Create an original character in Clout and make coordinated photos and videos around a recognizable identity. Use an accepted design, clear scene brief and reviewed output to build a recurring story rather than a collection of unrelated clips.


