

A retained performer and a new setting need to look as if they share the same space. Clean subject selection alone does not solve a mismatched light direction, floating chair or background that moves independently of the camera. Plan the replacement scene as carefully as the cutout.
This guide gives you a subject-isolation workflow and a practical test for a creator video. For removing a local distraction while retaining the existing environment, use the separate video object removal guide.
How to remove background in video for a social edit
To remove background on videos, work on a copy of the best available source and decide what should stay before selecting the tool. A person, a handheld product and the table may need to remain together. Removing everything except the face can leave a prop floating or cut off the hands that explain the product.
- Choose a short section containing a turn and a hand gesture
- Select subject isolation for ordinary footage or chroma key for a suitable solid-color backdrop
- Review the foreground mask throughout the section
- Add your replacement below the retained subject
- Match the light direction, camera level and contact points
- Export the intended delivery format and inspect that downloaded file
For a short UGC demo, keep the creator's face, grip and product outline readable. The background should support the demonstration rather than compete with it. If a fast hand crosses the product, inspect that moment at reduced playback speed and then in uninterrupted playback. A tool that produces one clean portrait frame may still lose the object during the gesture.
Compare VEED and Vmake by the export you need
| Tool | Documented operation | Export decision |
|---|---|---|
| VEED editor | Person isolation or solid-color chroma key | Its editor help says exported videos have a background rather than transparency |
| Vmake Labs | Subject isolation with green-screen or transparent output choices | Download the selected result and test it in your finishing editor |
| WaveSpeed model | Video input with optional replacement background image | Inspect the returned file and its supported output rather than assuming an alpha channel |
The VEED video background remover help places the person remover and Green Screen controls under AI Tools. Select the clip, open AI Tools and choose Remove Background. For a new setting, add an image behind the subject. Its editor documentation explicitly says exported videos are not transparent: without a replacement, the project color remains behind the subject. Do not confuse an editable cutout inside that editor with a reusable transparent download.
For a Vmake remove background workflow, its official video remover page describes uploading the clip, choosing green-screen or transparent output, then downloading for further editing. These are distinct deliverables. A solid green replacement still needs keying in the next editor; it is not an alpha channel. Confirm the current export options and account limits before processing a whole campaign.
These comparisons describe documented operations, not a hands-on quality ranking. Test the same source segment in each candidate and include download usability in the decision. A fast preview is less useful if the export cannot support your next edit.
Use WaveSpeed background remover with a concrete output brief
The WaveSpeed background remover model page exposes a video input and an optional background image, along with submission and result polling examples. Decide whether you need a completed scene or a reusable foreground before submitting. Check the returned output instead of inferring its format from the tool's name.
For a creator ad, supply a compatible background: a desk scene at the same camera height with light coming from the source's bright side. Keep the replacement quieter than the product demonstration. Record the model name, source segment and replacement file beside the result so the next comparison changes only one variable.
If you use the API, a submission ID is not a finished video. Wait for the job's terminal status, retrieve the output and inspect the full download. A failed or cancelled job needs a separate decision; do not treat a placeholder URL or a generated preview as an accepted campaign asset.
Use a greenscreen background remover for suitable footage
A greenscreen background remover keys a chosen color. AI person isolation estimates a subject boundary. The two methods can solve similar projects but have different failure modes. For chroma key, start with an evenly lit backdrop and avoid clothing or products that match the keyed color. Increase removal cautiously: aggressive sensitivity can erase a green label or a reflected highlight you intended to keep.
If the source contains uneven green shadows, inspect the remaining patches and the foreground edge separately. Do not try to solve every patch by destroying fine hair. For ordinary rooms with several colors, subject isolation may be the better starting operation. A green output added after AI removal does not repair errors already present in the foreground mask.
Prepare a TikTok edit after removing the background
If you searched for how to remove background from video for TikTok in 2026, separate removal from the final social layout. Choose your canvas before placing the cutout, keep the face and product inside the visible frame and leave room for captions. Preview the complete composite in the destination player; controls and caption placement can obscure an important gesture even when the source editor looks clean.
Do the background work before adding your final captions when you control the edit. Keep spoken audio aligned with the retained performance. If you crop to a vertical layout, review the hands and prop through the entire shot rather than checking only the opening. Use the caption guide for readable placement and the video upscaling guide when delivery softness is a separate issue.
Download a background removal review sheet
Download the blank background review sheet. It separates source, cutout and completed composite, with empty fields for the tool, export format, hair edge, hands and prop, contact, motion, audio and decision. Fill it from your own rendered clip; no provider scores or sample approvals are prefilled.
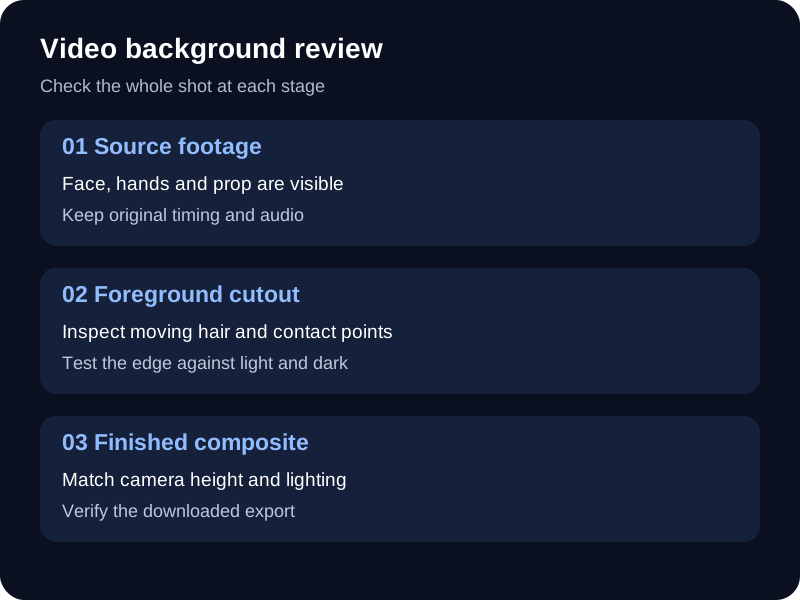
Download the review map. To learn how to remove backgrounds from videos reliably, keep this separation: first prove the retained foreground works, then prove the replacement scene fits, then prove the export works in the next editor or destination player. A checkerboard or black preview alone cannot establish all three.
Choose removal, replacement or scene regeneration
| Your goal | Workflow | Main review task |
|---|---|---|
| Keep the performer and remove the surroundings | Subject isolation and transparent output | Hair, hands and moving edges |
| Keep the performer in a new room | Subject isolation and compositing | Perspective, light and contact |
| Keep motion but rebuild the visual scene | Reference-led video transformation | Performance and identity continuity |
| Remove one cable from the room | Localized object removal | Repairing the area behind the cable |
A video background changer can expose different operations under similar names. Read whether the tool returns a transparent subject, a new composite or newly generated footage. Choose the result you need before judging the output.
Prepare footage that makes the edge test meaningful
Use a short clip of an adult creator seated at a table, turning slightly and making one hand gesture. Include the difficult moment you expect in the final video: curls moving, a hand crossing the body or a chair visible behind the arm. A static test with no edge movement is an incomplete trial.
Keep the highest-quality original available. Heavy compression and motion blur can obscure the boundary between a dark sleeve and a dark room. Preserve source timing and audio so the replacement does not introduce a separate synchronization problem.
Isolate and refine the subject
Adobe's Object Matte guide describes AI subject selection, manual refinement and propagation across frames. The suite includes selection and edge-refinement tools. Use the controls available in your installed version rather than copying an older interface blindly.
- Add the footage to a composition and open it in the Layer panel
- Activate Object Matte and preview the intended subject before selecting it
- Use the selection tools to correct the foreground and Refine Edge where needed
- Propagate the matte and review it across the relevant frames
- Freeze the accepted matte and return to the composition for the replacement scene
Begin on a representative frame where the face, hands and body are visible. Inspect what belongs to the foreground: is the chair retained, should the table stay, and is a prop meant to travel with the performer? Make those choices deliberately so the composite does not cut through contact points.
Review the matte over the full shot. Correct missing fingers, holes in clothing and background islands between the arm and body. Inspect a light and a dark preview background; an edge problem can disappear against one color and remain obvious against another.
Choose a replacement that matches the source camera
For the sample creator, choose a conservatory filmed at the same approximate seated eye level. A low-angle exterior placed behind a level portrait creates an inconsistent viewpoint. Use a setting with enough empty space around the performer and a believable location for the retained table.
Create a sunlit conservatory background for a seated adult creator filmed at eye level. The source light comes from camera left. Leave calm open space in the center for the performer, with plants and window structure farther behind. Keep the perspective natural, no foreground objects crossing the subject area and no lettering.
If the camera is locked off, a still background may suit the shot. For moving footage, inspect whether the background needs compatible motion and perspective. A gentle handheld source against a perfectly fixed room can make the performer look detached.
Match light, color and physical contact
Compare the source shadow and highlight direction with the proposed setting. A bright rim light from the right is difficult to explain in a room whose only visible light comes from the left. Pick a compatible scene rather than trying to conceal every mismatch with a strong color filter.
Check the contact between the performer, table and chair. Keep plausible overlap and shadows where the body meets a surface. If the cutout includes a chair but removes the floor shadow, restore a believable grounding cue in the composite. Review reflections only where the actual scene calls for them.
Finish with restrained color matching. Preserve natural skin detail and check that clothing has not acquired a bright fringe from the original backdrop. Compare a short export at the actual delivery size instead of relying solely on the editor preview.
Test a retained subject and a regenerated scene separately
A tool may rebuild the surrounding environment or transform the entire shot instead of returning a matte. For that route, write what must remain fixed and compare identity, clothing, gesture and timing after generation. Higgsfield's background changer page describes a background-changing workflow; its promotional examples do not establish preservation on your own clip.
If exact recorded performance is essential, choose a workflow whose output you can inspect against the source. Do not assume a smooth generated scene kept every original hand gesture or facial expression.
Check the export you actually need
For a finished social video, export the complete composite and review it with sound. For a reusable cutout, choose an output format and settings that support transparency. Adobe's export guide explains output module settings and notes that not all codecs support alpha channels. In After Effects, select RGB+Alpha with a supporting codec in the output module for a color image with transparency. A black background in a preview is not proof of a usable alpha channel; import the file over another scene and check it.
A free video background remover is useful only when the download fits the project. Check watermark, frame size, clip length and whether transparency is included in the free export. Count finishing time and rejected frames when comparing tools.
Keep the creator consistent across settings
Use Clout to create your original AI character and plan a series of photos and videos with coherent identity and art direction. Choose each environment to support the character and story, then review the finished video as a whole.


