

For animated files, use the AI GIF upscaler guide to review frame timing, transparency and the final export with downloadable animation tests.
A soft video does not always need a new generation. It may be a small preview stretched across a large display, a heavily compressed download, or a crop from a larger frame. An AI video upscaler addresses resolution and estimated detail; identifying the actual problem first saves unnecessary processing.
The useful question is whether the final clip looks better in motion at the size your audience will see it. A sharper paused frame can still contain flickering skin, invented eyelashes or unstable product lettering.
Check the original file before choosing an upscaler
Find the original export from your generator, camera or editing project. Check its frame dimensions, duration and frame rate in a media inspector. Keep that file untouched. A social-platform download or messaging-app copy may have already lost detail through compression.
If the original is sharp but a website preview is blurry, inspect which source the page loads and how wide it displays. Serving a thumbnail at hero size is a delivery problem. Fixing the source selection can be better than upscaling that thumbnail.
| Problem | First action | Where upscaling fits |
|---|---|---|
| A tiny preview is stretched | Find and serve the full-resolution source | Usually unnecessary if the original is good |
| Low-resolution footage looks soft | Test enhancement on an original short section | May improve perceived detail |
| Fast movement is smeared | Check motion blur and source quality | Do not expect reconstruction of exact missing detail |
| The face or product is malformed | Repair or regenerate the source | Extra pixels will not fix the underlying design |
| The export has blocks or banding | Check compression settings and generation chain | Test cautiously; artifacts may be amplified |
How to enhance Sora video quality from a saved clip
A Sora video enhancer processes an exported file; it is a finishing step rather than access to the original generator. OpenAI's discontinuation notice lists April 26, 2026 for the web and app experiences and September 24, 2026 for the API. Those dates have passed as of this October 4 update. This workflow is for a clip you already saved. A third-party Sora enhancement landing page does not prove continued access to OpenAI generation.
Start with the highest-quality export you possess. Keep its original filename, dimensions and duration in your review notes. A downloaded social preview can be a different file from your accepted master. Use the local video source checker to inspect browser-readable dimensions and duration without uploading the clip. It does not identify the codec or assess every frame.
| Saved clip problem | First test | Accept only if |
|---|---|---|
| Sora video looks soft at delivery size | Compare the original with a conventional resize before adding AI enhancement | The export fits the player and the identity stays recognizable |
| Sora video has unstable facial detail | Review a blink, mouth movement and mild head turn in a short sample | Added detail stays consistent through motion |
| Compression blocks surround hair or captions | Check for a cleaner original, then compare conservative processing | Edges improve without new halos or changing letters |
| Hands or product geometry are already wrong | Return to a usable source or edit that shot | The underlying scene is correct before resolution changes |
A Sora 2 video upscaler cannot prove what an obscured hand originally looked like. Reject an apparently sharper result that changes a character or product. When the original no longer exists, keep that uncertainty in the asset record rather than claiming recovered ground truth.
Free Sora video enhancement versus a free resize
If you searched how to enhance Sora AI video quality free, there are three different offers to distinguish: conventional resizing with free software, a supported open-source AI model on your hardware, and a hosted trial with limited credits. Conventional resizing is the simplest baseline, but it is not AI restoration. A local model avoids a hosted per-clip charge while still requiring compatible hardware, processing time and review.
| Option | Documented scope | Free-use decision |
|---|---|---|
| FFmpeg | Conventional scaling and encoding | Run locally; no hosted enhancement credits required |
| Video2X | Local model filtering and separate interpolation on supported Windows or Linux hardware | Check the release and Vulkan requirements before setup |
| Media.io Sora enhancer page | Hosted video enhancement with signup trial credits | Verify current allowance, sample charge and export conditions in the account |
| Topaz Sora upscaler page | Commercial video enhancement workflow for saved clips | Confirm the chosen desktop or hosted offer; do not assume unlimited free exports |
Media.io's official page advertises signup credits, while Topaz's Sora upscaler page describes its enhancement workflow. These are vendor descriptions, not our quality benchmarks. We have not tested their processing on Sora footage. Record the actual sample cost and downloadable output conditions before paying for a larger job.
To make a landscape baseline while preserving aspect ratio, scale the height to 1080 and let FFmpeg calculate an even width:
ffmpeg -i saved-clip.mp4 -vf "scale=-2:1080:flags=lanczos" -c:v libx264 -crf 18 -pix_fmt yuv420p -c:a aac -movflags +faststart baseline-landscape.mp4For portrait footage, use scale=1080:-2:flags=lanczos instead. An exact 9:16 source becomes 1080 by 1920; other source ratios produce a different height. Neither operation crops or stretches the picture into a different aspect ratio. The command creates a new encoded file, so review picture and audio after export. Avoid repeatedly processing the previous result.
Download the saved-video enhancement checklist and commands. Try the supplied synthetic motion files below to understand the baseline, then use your own saved clip for identity, skin, hair and product checks. The synthetic examples were not generated with Sora and contain no AI restoration result.
Review a Sora enhancer sample before a full batch
- Choose a short segment that includes the difficult motion, not only an attractive opening frame
- Keep the original, conventional resize and AI candidate in separate files
- Record tool, model or mode, target dimensions, actual charge and output restrictions
- Compare at equal display size, then inspect the face, text and product at native size
- Watch uninterrupted playback and check audio sync at the beginning and end
- Approve the settings only when the complete clip meets the delivery brief
A Sora video enhancer free trial is useful when it lets you evaluate the actual export you need. A preview alone cannot establish download quality. Leave an untested setting or unknown cost blank in the review sheet. For a new creator campaign, use the current Sora alternatives guide to choose an accessible production workflow, then apply the same finishing checks to its exports.
AI upscale video starts with the delivery size
If you searched for AI upscale video, separate the output dimensions from the quality improvement. A larger frame can help a clip fit a delivery specification, but it does not establish that the face, fabric or product is more faithful. Decide where the video will play before selecting a target. For a vertical creator clip, 1080p commonly means 1080 by 1920, while a landscape 1080p frame is 1920 by 1080. The same pixel count does not make the two crops interchangeable.
To upscale a video, keep its aspect ratio unless you intentionally crop it. Stretching a landscape clip into a vertical frame changes faces and product proportions. A crop can also discard much of the source: check the remaining subject before spending time on enhancement.
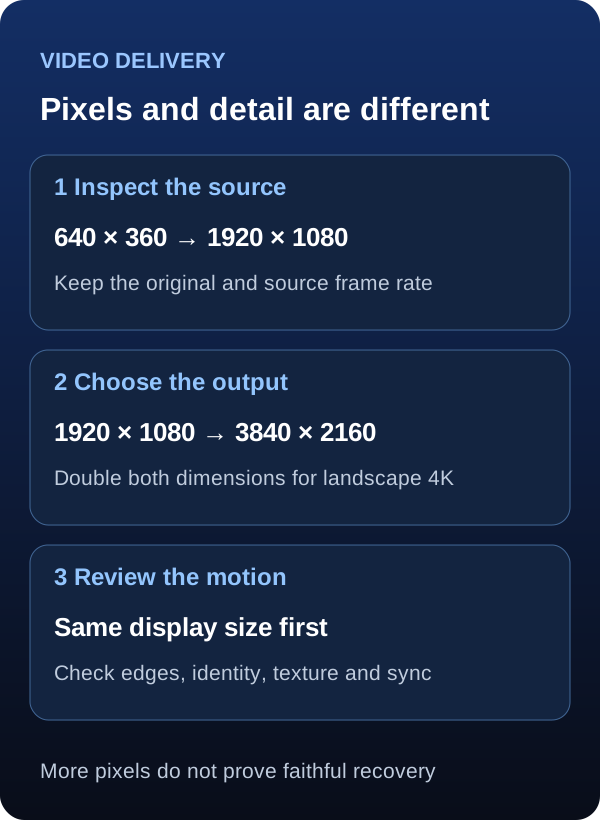
Choose dimensions and review motion as separate decisions
Download the delivery mapChoose video upscaling software by the operation
| Workflow | Documented operation | What to test |
|---|---|---|
| Topaz Video desktop | Resolution and video-type controls, enhancement models and previews | Hardware compatibility, sample playback and exported detail |
| Topaz Astra in Adobe Firefly | 1080p or 4K targets with Precise or Creative mode | Identity preservation, upload eligibility and actual account cost |
| FFmpeg scaling baseline | Conventional scaling with a selected filter | Whether ordinary resizing already meets delivery needs |
Topaz's quick start documents output resolution, video type, preview and export controls. Its enhancement guide distinguishes progressive and interlaced inputs and notes that available resolutions depend on the model. Those controls matter when comparing desktop software with a browser workflow. Check system requirements before committing a long job.
For an AI video upscale comparison, use one untouched source and one target across the selected tools. Record which filters are enabled. Upscaling, denoising, stabilization and frame interpolation can all change the result, so begin with only the operation you need. The table describes documented workflows rather than a ranked quality test.
How to AI upscale video locally
To AI upscale video locally, run the enhancement model on your own machine instead of submitting footage to a hosted processing service. First confirm that your operating system, GPU and drivers support the exact release you plan to use. Downloading a desktop interface does not by itself establish where inference happens; check whether its selected operation uses a local model or a cloud service.
For a recurring creator campaign, test a short segment with a blink, moving hair and a visible product edge. Keep the source, a conventional resize and the AI candidate together. Local processing gives you control over the files and settings, but it does not guarantee better identity preservation or faster processing than a hosted tool.
Choose an open source video upscaler by its pipeline
| Option | Documented workflow | Before your first test |
|---|---|---|
| Video2X | Integrated video filtering and separate frame interpolation | Check the release platform, Vulkan support and CPU requirements |
| Real-ESRGAN ncnn Vulkan | Image or directory enhancement with supplied models | Plan frame extraction, filename continuity and video reassembly |
| FFmpeg | Frame extraction, conventional resizing and encoding | Use it as a timing and export baseline, rather than an AI model |
Video2X's official repository documents Windows and Linux support, a Vulkan-capable GPU requirement and AVX2 support for precompiled binaries. Upscaling and interpolation are distinct modes. Its linked Colab option runs on hosted infrastructure; that option is not a local workflow. Follow the installation instructions for your exact platform rather than assuming every desktop can run the same binary.
Real-ESRGAN's portable implementation accepts image files or directories and exposes model, scale, tile and GPU settings. It provides a frame-processing building block rather than a complete audio-and-video edit. Check the installed binary's help and available models before choosing settings.
An open source AI video upscaler still takes setup time, hardware resources and review. Do not rank these projects by an untested quality score. Choose the integrated pipeline when you want fewer manual steps; choose a frame pipeline when you need to inspect or manage individual outputs. Frame-by-frame enhancement can produce texture flicker even when each still looks attractive.
Test a local frame workflow before applying an AI model
Start by proving that extraction and reassembly preserve timing. Our original silent test is three seconds long, with 72 frames at 24 fps and a 640 by 360 picture. The downloadable PNG frame pack contains every decoded source frame, numbered from frame-0001.png through frame-0072.png. The reassembled test video uses those unchanged frames. It is an encoding roundtrip, not an AI enhancement result and not a pixel-identical copy of the compressed source.
Create an empty frames directory in a new test folder, place the source beside it and extract the frames:
ffmpeg -i video-upscale-test-source.mp4 -fps_mode passthrough frames/frame-%04d.pngFor the supplied constant-frame-rate test, rebuild a video from the unchanged sequence:
ffmpeg -framerate 24 -i frames/frame-%04d.png -c:v libx264 -crf 18 -pix_fmt yuv420p -movflags +faststart roundtrip.mp4The FFmpeg image-sequence documentation describes numbered filenames and the input frame-rate setting. Here, 24 is the known rate of our test. Do not reuse it blindly for other footage. A variable-frame-rate source requires an explicit timing plan; numbered images alone do not retain its original presentation timestamps.
Before processing with a model, confirm 72 readable frames, three seconds of playback and the expected motion. Then use a separate output directory for the enhanced frames. Do not overwrite the originals. Check that each output keeps the matching sequence number and that all outputs have consistent dimensions. Missing frames or renamed files can break the sequence even when the model itself ran successfully.
For a local AI video upscale experiment, change only the enhancement step after the unchanged roundtrip passes. Keep the same source frame count and playback rate. Reassemble the processed images, then compare the whole clip at equal display sizes. Our downloadable pack contains no model output; you supply and review that stage on your supported machine.
Keep audio and motion intact during open source video upscaling
The frame pack has no audio. For footage with sound, keep the original clip available and restore its audio during finishing. Confirm that the new picture has the same duration and starting point before matching dialogue. Watch a spoken consonant or a visible tap near the beginning and end; a single correct opening moment does not prove the entire sequence stays synchronized.
If a model output adds frames, a reassembly command changes playback speed or the source uses variable timing, fix that timing problem before mixing audio. Do not conceal a mismatched duration by merely trimming whichever stream ends later. Review the exported picture and sound together.
Download the local test commands and review procedure. Record the release, model, device, elapsed processing time and output dimensions beside your sample. Keep enhancement separate from frame interpolation in the first test. For faces and UGC props, reject a sharper result that changes the creator or invents product lettering.
Prepare a 4K upscale video upload
Before a 4K upscale video upload, check the input file's dimensions, duration, frame rate, codec and size. MP4 is a container; an MP4 filename alone does not identify the codec or guarantee that an uploader can decode it. If the service rejects the clip, compare its current input requirements with the actual file before changing the resolution.
- Keep the original master in a separate folder
- Make a short sample that includes the difficult action
- Check the current upload limit and accepted format
- Select a target with the correct aspect ratio
- Download and inspect the processed sample before uploading the full clip
If you use command-line tools, ffprobe can report stream metadata. This inspection command reads the file without modifying it:
ffprobe -v error -show_entries stream=codec_name,width,height,r_frame_rate -show_entries format=duration,size -of json input.mp4A 1080p-to-4K upscaler doubles each dimension of a standard landscape 1920 by 1080 frame to 3840 by 2160. That produces four times as many pixels, not four times as much captured information. Keep the frame rate unchanged during the first resolution test; increasing it is a separate timing experiment.
Download motion tests for a 1080p scaling baseline
These two original three-second test files contain moving shapes and fine edges. The first is 640 by 360 at 24 fps. The second was conventionally resized to 1920 by 1080 with FFmpeg's Lanczos filter. They demonstrate dimensions and motion review, not AI detail recovery or a provider benchmark.
Download the 640 by 360 source test and download the 1920 by 1080 resized test. Play them at the same displayed size. Then inspect the resized file at its native dimensions. Notice that a larger export cannot create a new photographed face or real product detail that never existed in this synthetic source.
Play each clip with its controls. They are independent players, not a synchronized comparison or an AI enhancement demonstration.
To reproduce the baseline locally, run this command on the downloaded source. It writes a new file and copies audio when present. The provided test has no audio:
ffmpeg -i video-upscale-test-source.mp4 -vf "scale=1920:1080:flags=lanczos" -c:v libx264 -crf 18 -pix_fmt yuv420p -c:a copy -movflags +faststart baseline-1080p.mp4The FFmpeg scale documentation describes resizing and scaling options. This is a conventional MP4 upscaler baseline, not an AI model. The command's fixed landscape dimensions suit the supplied test; adapt the output to preserve the aspect ratio of other footage.
When you upscale video to 1080p, compare an ordinary resizing baseline with any AI result before deciding which to publish. Use your own creator footage for identity, hair, hands and product accuracy. A synthetic test is useful for edges and movement but cannot prove how a model handles a real face.
Record the result before processing the whole campaign
Download the blank video upscaling review sheet. It has rows for the source, conventional resize and AI candidate, with empty observation fields. Record dimensions, frame rate, tool and mode, actual charge, facial changes, edge artifacts, motion stability, audio sync and the decision after viewing your exports.
Download the test specifications and commands. Keep the sample review alongside the accepted settings. If a test introduces pulsing fabric or changes product text, reject it even if the opening frame looks sharper. Review the final upload too: platform delivery can look different from the file on your computer.
Compare workflows before paying for a subscription
Adobe Firefly's video upscaler documents Topaz Astra enhancement with 1080p and 4K output choices and Precise or Creative modes. Its page also lists upload constraints. Check those current limits against your file before choosing the workflow.
Compare tools using the same source segment and target resolution. Record input limits, processing cost, queue time, output format and whether the downloaded file has a watermark. Treat a free trial as a way to evaluate your footage; it does not establish that all exports are free or unlimited.
For creator content, start with a mode designed to preserve the source rather than invent a new visual interpretation. Creative enhancement can be interesting for stylized footage, but recognizable faces and exact product details need close review.
A controlled upscaling test
- Choose a representative segment: include a face, a textured background and some movement. Avoid testing only the easiest still frame.
- Set one target: test 1080p first when that is your delivery requirement. A 4K label alone does not justify a larger file.
- Keep timing stable: preserve the source frame rate for the first comparison so frame interpolation does not complicate the test.
- Process the sample: note the exact mode and settings beside the filename.
- Compare at equal size: view source and result at the same display dimensions, then inspect detail at native scale.
- Watch the full motion: check blinking, teeth, fingertips, clothing texture and camera movement.
- Apply accepted settings: process the remaining clip only after the sample passes.
For a ten-second talking clip, inspect the opening, a blink, the widest mouth movement and a frame where a hand crosses the face. These moments can reveal problems that a static portrait comparison misses.
Use a simple acceptance sheet
| Check | Accept when | Reject or adjust when |
|---|---|---|
| Identity | Face remains recognizable in every inspected moment | Features change or synthetic skin details pulse |
| Edges | Hair and clothing look natural | Bright halos surround the subject |
| Texture | Fine detail remains stable in motion | Fabric or background patterns crawl |
| Product accuracy | Labels and geometry match the original | Letters, numbers or mechanisms change |
| Playback | Audio and motion remain synchronized | Timing changes, frames stutter or sound drifts |
If detail shimmers, reduce enhancement strength where the tool offers it or use a more conservative mode. If the face is already wrong in the source, return to the generation or edit. Do not repeatedly upscale the previous result; compare each test with the untouched original.
Finish captions and delivery after the picture is approved
When you control the edit, add captions after enhancement so text stays clean and editable. If subtitles are already burned into the source, check whether upscaling changes their outlines or letter shapes. Keep captions inside the visible area of your intended player and account for platform controls.
Export the approved master once for the destination. Avoid passing it through a series of messaging apps or downloads before publishing. Open the final file in another player, watch it from beginning to end, and check the live page or upload at its actual display size.
Generate a stronger source for the next campaign
In Clout, start with an approved creator image and generate your photos and videos around that identity. Inspect the first frame for a clear face, natural hands and accurate product details before adding motion. That gives the finishing process a better source to work with. Create your next creator video from an image you already approved.
Clout's creator workflow and an external video upscaler serve different steps. This guide does not claim that Clout is a standalone 4K restoration service.


