Rembrandt lighting is a portrait pattern identified by a small triangle of light on the cheek opposite the main light. The nose shadow joins the cheek shadow while the patch beneath the eye remains illuminated. To create it, begin with a directional source above and to one side, then adjust the light or face while watching the actual shadow connection.
This guide explains the setup and shows three original AI portrait results: a Rembrandt request, an independent loop-light edit and an independent fill edit. They give you concrete features to inspect when planning a photographic portrait, an AI character image or a dramatic reference frame.
What is Rembrandt lighting
The defining feature is the illuminated patch under the eye on the darker side of the face. In the Profoto Rembrandt lighting tutorial, Hannah Couzens raises the source and moves it to the side until the nose and cheek shadows meet. The useful test is the resulting face pattern, rather than a source angle written on a diagram.
The patch does not need to look like a drawn geometric symbol. Facial shape, head direction and shadow softness influence its outline. Inspect it as part of the face: the nose shadow should connect to the darker cheek region, with a readable lit area beneath the eye. A dark portrait alone does not establish this pattern.
Camera-left and camera-right in this guide mean the sides of the picture as viewed from behind the camera. In our original example, the main illumination is from camera-left and the small lit patch appears below the camera-right eye. Keeping that convention explicit makes a reference brief easier to interpret.
How to set up Rembrandt lighting
- Choose the framing and the direction the subject will face.
- Start with a directional key above eye level and to one side.
- Watch the nose shadow as you move the source or adjust the face.
- Find the position where the nose and cheek shadows connect while leaving the small cheek patch lit.
- Check eye readability, shadow detail and the overall expression.
- Adjust fill and background illumination while preserving the intended pattern.
For a physical shoot, make a test image at the actual camera position. Moving the face changes its relationship to the light even when the stand stays still. A larger source, a different distance or surrounding wall bounce can also change the appearance of the shadows. Keep the arrangement simple enough that you can identify which change affected the result.
For a generated portrait, describe the same visible relationships and inspect the returned image. A request for a particular lens look or light position is creative direction unless the chosen workflow exposes a corresponding control. Save the reference, exact prompt and actual result together so a successful example can inform the next revision.
Inspect our original Rembrandt portrait example
We generated an original fictional adult man in a teal overshirt against a dark warm-gray background. The base request specified a frontal face, camera-left illumination, connected nose and cheek shadows and a small lit patch below the camera-right eye. We then made two separate edits, each referencing that same base PNG.
The images below are actual outputs from the built-in image_gen tool. The tool result did not expose its backend model or inference settings. We inspected the visible pattern; we did not conduct a physical shoot, measure a light ratio or run a Clout provider job. The cover is a separate generative composition using the base as its reference.



| Returned image | Visible observation | What to check |
|---|---|---|
| Rembrandt request | A small illuminated patch remains beneath the camera-right eye, bounded by darker nose and cheek regions | The shadow connection and readable eye above the patch |
| Loop edit | The nose shadow becomes shorter and the camera-right cheek is more broadly illuminated | The isolated triangular patch is absent |
| More fill edit | The darker cheek becomes brighter and the triangle is less distinct | How much light-dark separation the intended portrait needs |
The broad fictional identity, gaze, crop and clothing remain close across these results. Skin texture, hair detail, tonal balance and shadow edges can shift. These edits therefore illustrate requested changes rather than an isolated, pixel-aligned relighting pass. Download the original PNGs to inspect the details at full size instead of relying on a small comparison card.
Rembrandt lighting versus loop lighting
Look first at the nose-to-cheek shadow connection. The Rembrandt pattern leaves the small illuminated cheek patch inside that relationship. A loop pattern has a shorter nose shadow with more of the opposite cheek open to light. Our loop edit makes that distinction visible without changing to a different fictional subject.
Profoto’s portrait lighting patterns walkthrough describes loop light as a directional arrangement in front of and above the subject. Westcott’s loop lighting demonstration likewise uses a source to the side and above the face, with a reflector available to soften the shadows. Use those starting relationships, then judge the actual pattern.
A face turn can change what you see, so keep pose and crop similar when comparing candidate references. Avoid deciding that one pattern is universally better. An open cheek may serve an approachable explanation; more separation may suit a dramatic character portrait. Choose the result that supports the subject and the intended image.
Why fill can make the triangle harder to read
Fill lifts the darker areas. In our independent fill edit, the camera-right cheek becomes substantially brighter and the lit patch loses its strong separation from the surrounding face. That is useful evidence of the requested visual change, although it supplies no numerical exposure ratio.
When the goal is a distinct Rembrandt pattern, inspect whether added fill leaves enough contrast to read the patch and the connected shadows. For a physical setup, account for surrounding reflections as well as a separate fill source. For an AI edit, specify which shadow relationship should remain visible and compare the returned image with the original.
Our negative fill guide explores the separate idea of reducing unwanted reflected fill. Use the chiaroscuro lighting guide for a broader light-dark study. Rembrandt lighting identifies a particular portrait pattern within that larger creative discussion.
Use the editable starting diagram
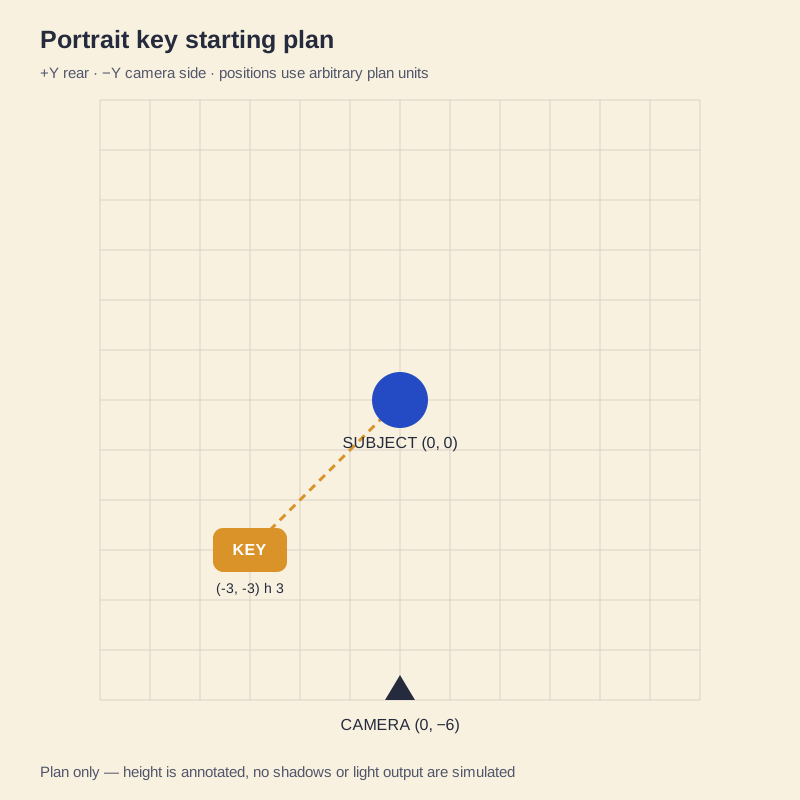
The starting diagram records a fixed frontal subject, a camera and one conceptual key on camera-left. Its editable plan JSON opens in our existing free lighting diagram maker. Download the JSON, use Restore a lighting plan JSON in the maker, then edit the fields for your own brief.
The coordinates are arbitrary planning units. They are not an inferred rig for the portraits or verified parameters for a generative model. The suggested height is an annotation; the diagram does not calculate the nose shadow or predict whether a face will show the triangle. Keep your actual image beside the plan when reviewing it.
Write an AI portrait lighting prompt around visible features
The full generation and edit prompt pack records the requests used for this study. A shorter starting brief can state the subject, pose, light direction and defining shadow connection before adding mood language.
Create an original fictional adult portrait with a frontal face and soft directional illumination from camera-left above eye level. Connect the nose shadow with the camera-right cheek shadow while leaving a small illuminated triangle below that eye. Preserve readable eyes, natural skin texture and a calm expression. Use a teal overshirt and a dark neutral background.
For an edit, name the supplied reference and the details to preserve: identity, pose, clothing, crop and background. Then request one lighting change. Both comparison edits here used the same original reference independently, so the fill case did not inherit the loop edit as an intermediate result.
When developing an image in Clout Image and Video, choose a supported operation and approved references, inspect the current options and quote, then review the actual output. These study files do not establish that every Clout model accepts a lighting-control parameter or reproduces this pattern equally well.
Review a portrait before using it in a sequence
Check the cheek patch, the nose shadow and eye readability first. Then compare facial proportions, hair, skin detail, clothing and background against the reference. Record a specific miss, such as an open cheek where the triangle was intended or a changed expression that alters the character.
For a recurring AI influencer or a dramatic portrait used in AI Cinema, save the accepted still as a reference and review each later result. This page contains still-image evidence. A moving head or camera can alter the apparent pattern, so a video needs its own complete playback review.
The blank portrait review CSV records candidate, source, triangle visibility, shadow connection, eye readability and drift. Its outcome fields start empty. Use it for your actual results rather than treating a prompt request as an acceptance decision.
Download the original portraits and source pack
- Original Rembrandt portrait PNG
- Independent loop edit PNG
- Independent fill edit PNG
- Printable comparison with embedded images
- Dated source and observation record
- Complete original portrait and planning pack
The source pack includes unmodified study PNGs, WebP copies, prompts, the editable diagram, a blank review sheet, printable HTML and file hashes. Open the printable HTML in a browser to Print or Save as PDF. Keep it alongside the actual outputs when deciding which lighting reference to use next.