

Deep focus cinematography keeps important foreground, middle-distance and background information readable in the same shot. The purpose is to let relationships across depth remain visible. A near prop can matter at the same moment as an action farther away, without waiting for a cut or a focus change to reveal it.
This guide compares three original frames from one authored 3D scene. A red key stands near the camera, a striped vase occupies the middle distance and a clock sits on the far wall. The camera and objects stay fixed while the focus settings change. You can inspect the rendered images, download the native Blender files and adapt the review questions to an AI cinema brief.
What is deep focus in film
The Columbia Film Language Glossary describes deep focus as a combination of cinematography and staging that gives near and distant planes sharpness together. The glossary includes a Citizen Kane example. Our examples here are newly authored, rather than copied frames from that film.
Deep focus describes what remains readable through depth. A wide shot describes how much of a scene is included. A wide shot can have a blurred background, and a tighter frame can still preserve more than one important depth plane. Decide which information needs to coexist before choosing a camera or writing a generation prompt.
Depth of field is a range of acceptable sharpness around the focus position. It does not mean every surface has mathematically identical sharpness. Judge the critical details at the intended display size. A clock face that is recognisable in a small preview may still lose the markings needed by the story in a larger export.
Deep focus versus shallow focus and rack focus
| Choice | Information it keeps available | Example decision |
|---|---|---|
| Deep focus | Important near and far details remain readable together | Show the key and the distant clock in the same frame |
| Shallow focus | A narrower depth region is sharp while other planes soften | Prioritize the key while the clock becomes less legible |
| Rack focus | Sharpness transfers between targets over time | Begin on the key and later reveal the clock |
| Split diopter setup | A different optical approach to separated near and far subjects | Plan the foreground, background and potential division carefully |
Use the rack focus guide when the transfer itself carries the beat. Its local planning lab illustrates attention moving between drawn targets. For the separate near-and-far technique, see the split diopter composition guide. These techniques can solve different scene problems; they should not be treated as interchangeable names for a sharp-looking picture.
Inspect our original three-plane focus study
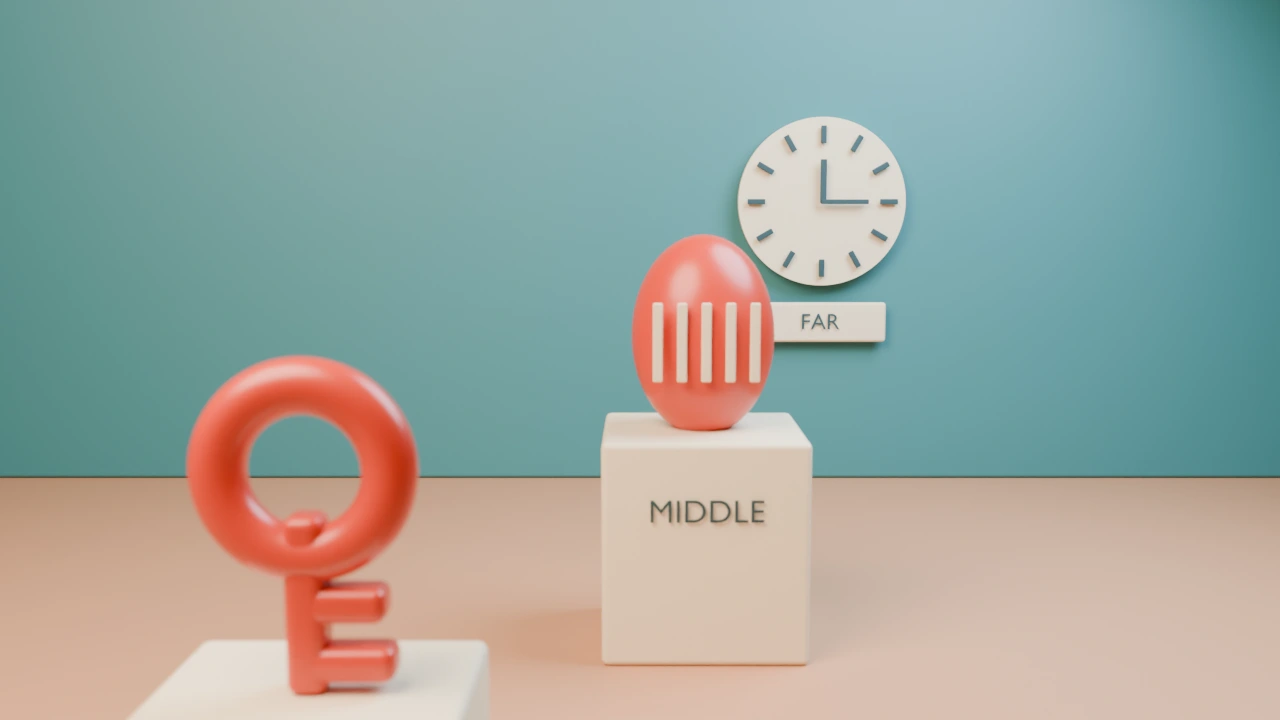
The images below are actual conventional renders from one original Blender scene. They are not generated photos, a physical camera test or outputs from a Clout model. We used Cycles with 64 samples, denoising, AgX viewing and 1280 by 720 output. The source record identifies the installed Blender version.
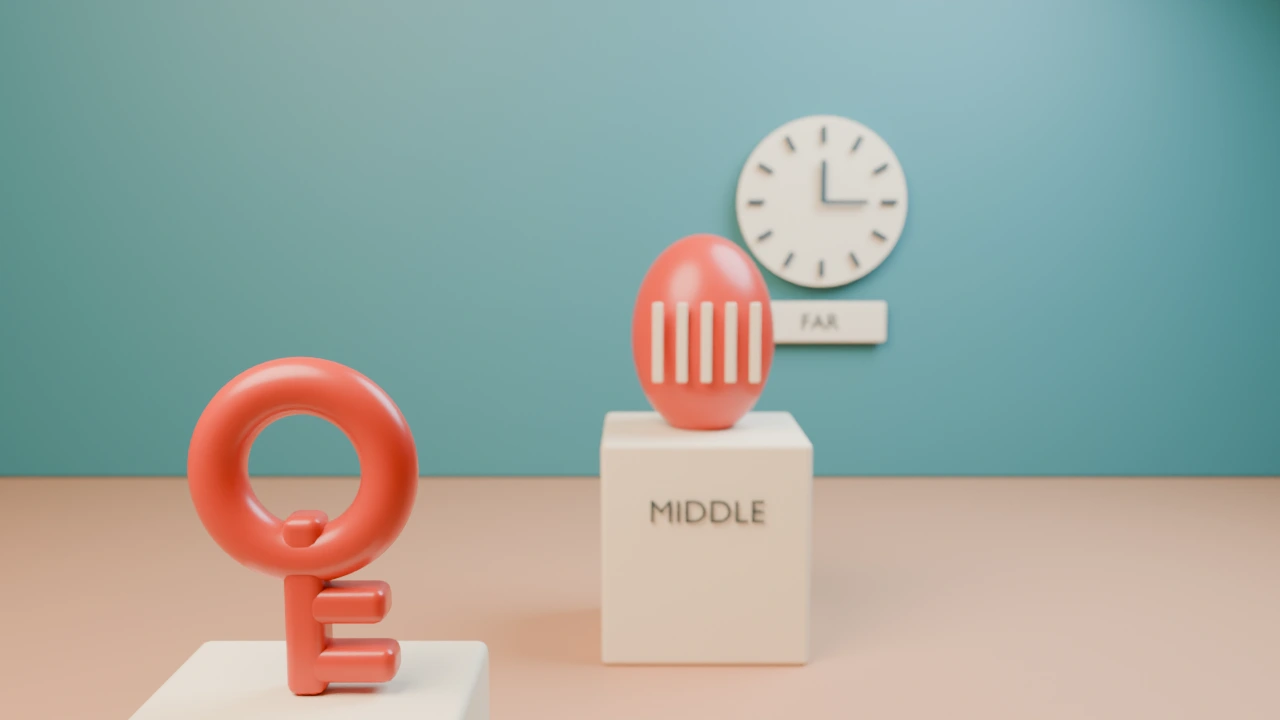
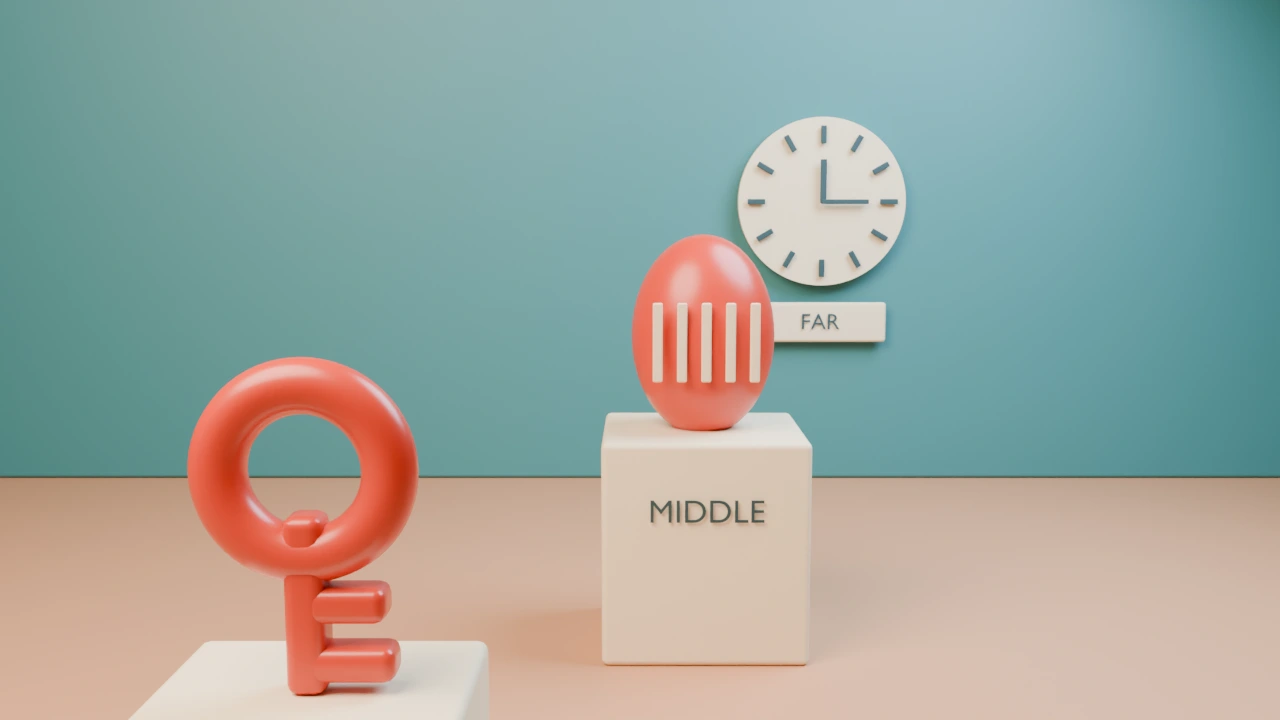
The first and second frames use the same near focus target. The only intended scene-setting difference is simulated aperture: f1.4 versus f16. The clock markings, far label and vase edges are clearer together in the f16 image. In the near-focused f1.4 image, the foreground key receives emphasis while distant detail softens.
The third frame restores f1.4 and changes the focus target to the far plane. The key visibly softens while the clock is clearer. This is a separate static comparison, not an animated rack focus. We did not render a transition, measure audience attention or compare AI models.
Read the camera settings without treating them as a universal recipe
| Setting | Recorded study value | What it establishes |
|---|---|---|
| Camera lens and sensor width | 35 mm and 36 mm in Blender | The virtual camera setup used for these images |
| Near target camera depth | About 3.05 scene units | The same near target for the aperture pair |
| Far target camera depth | About 9.23 scene units | The target used in the third still |
| Simulated aperture | f1.4 then f16 then f1.4 | The aperture values stored in the native files |
| Geometry and camera transform | Fixed across all three cases | Differences are not caused by a deliberate reframe |
The downloadable JSON also records the target positions and camera-to-target distances. Camera-axis depth and straight-line distance are different measurements, so the record labels both. Keep the native scene with the images when reproducing this study rather than copying one number into an unrelated scene.
Blender’s depth-of-field rendering is a controlled visual comparison here. We held light energy and exposure fixed. We did not model the exposure compensation, diffraction, noise or particular optical imperfections of a real lens. The f16 render therefore does not establish a physical camera’s brightness or image quality at f16.
Plan deep focus for an owned camera setup
Nikon School’s depth-of-field guide explains that higher f-numbers generally increase the depth range of acceptable sharpness, while admitting less light. It also discusses subject distance and the need to manage exposure. Use those principles as a starting point and inspect your actual near and far details.
Begin by deciding where the nearest required detail and farthest required detail will sit. Select a framing that keeps both visible, choose a focus position and test the available aperture. If the needed detail is still soft, reconsider the distances, lens and staging rather than assuming one f-number must solve every arrangement.
Account for movement and the real shooting conditions. A person can leave the useful sharpness range during a take. Additional light, a different exposure choice or a simpler arrangement may be necessary. Check the actual camera and lens guidance before relying on a fixed focus strategy for an important recording.
Give the foreground and background different jobs
A scene needs more than several sharp objects. In an original drama brief, the key might sit untouched near the camera while the clock explains how long a character has left to act. In a product video, the foreground package might identify the item while a clear background action demonstrates its use.
Our key, vase and clock are inspectable geometric targets, not a finished dramatic performance. The vase supplies middle-distance edges for comparison. If adapting the scene into a story, give that middle layer a useful action or remove it. Extra sharp detail can compete with the actual beat.
The shot composition guide compares framing, empty space and foreground structure using another original study. Use those questions alongside focus: check whether the clock is hidden by the vase, whether the key edge is readable and whether a mobile crop preserves both important planes.
Write an AI deep focus brief around readable details
The following is an original, untested creative brief. It describes a visible result rather than claiming access to an optical control in a particular model.
One locked wide view of an original fictional workshop. A red key stands on the near workbench, an adult locksmith waits at a middle-distance bench and an ivory clock hangs on the far wall. Keep the key outline, the person and the clock markings readable together. Separate their silhouettes, preserve the room arrangement and use natural light. No cut, focus pull, zoom, new objects or changing clock design.
Prepare an accepted reference frame before asking for motion. In Clout Image and Video or AI Cinema, inspect the selected workflow’s supported inputs and current quote. A written request for deep focus or an f-stop does not prove that the model exposes a physical aperture parameter.
Review the actual output for the named details. If the clock turns into a different design, the person disappears or the background softens, record that miss instead of accepting the phrase “deep focus” in the prompt as evidence. The separate generated cover on this page is conceptual editorial art, not an additional controlled focus case.
Review the complete image or video
Use the blank focus review CSV to record the near, middle and far detail required by your scene. It includes fields for readability, occlusion, framing drift and the acceptance decision. The result fields begin empty.
For a still, inspect all critical planes at the delivery size and the final crop. For a video, watch the full export, then inspect frames where a hand, character or camera moves. Look for unintended focus changes, flicker, softened backgrounds and new or disappearing detail. A sharp opening frame does not establish that the remaining shot keeps the relationship intact.
Record accepted takes in the shot list maker with the intended beat and continuity notes. Keep a source reference for each important object so later shots can be reviewed against the same design.
Download the native focus study
The complete deep focus source pack includes three native Blender scenes, original PNG renders, WebP copies, the scene-building Python script, recorded camera settings, an authored AI brief and a blank review sheet. File hashes identify the released assets.
Open the printable focus comparison to view all three embedded renders and use Print or Save as PDF. The render settings record preserves the actual configuration and limitations. These files let you inspect the example without treating it as a physical lens measurement or a generated video benchmark.


