An AI VFX workflow starts with a clear change and a reference for everything that should remain. Decide whether you are designing an effect still, editing existing footage or combining separate layers. Those jobs can share a visual idea while requiring different inputs and checks.
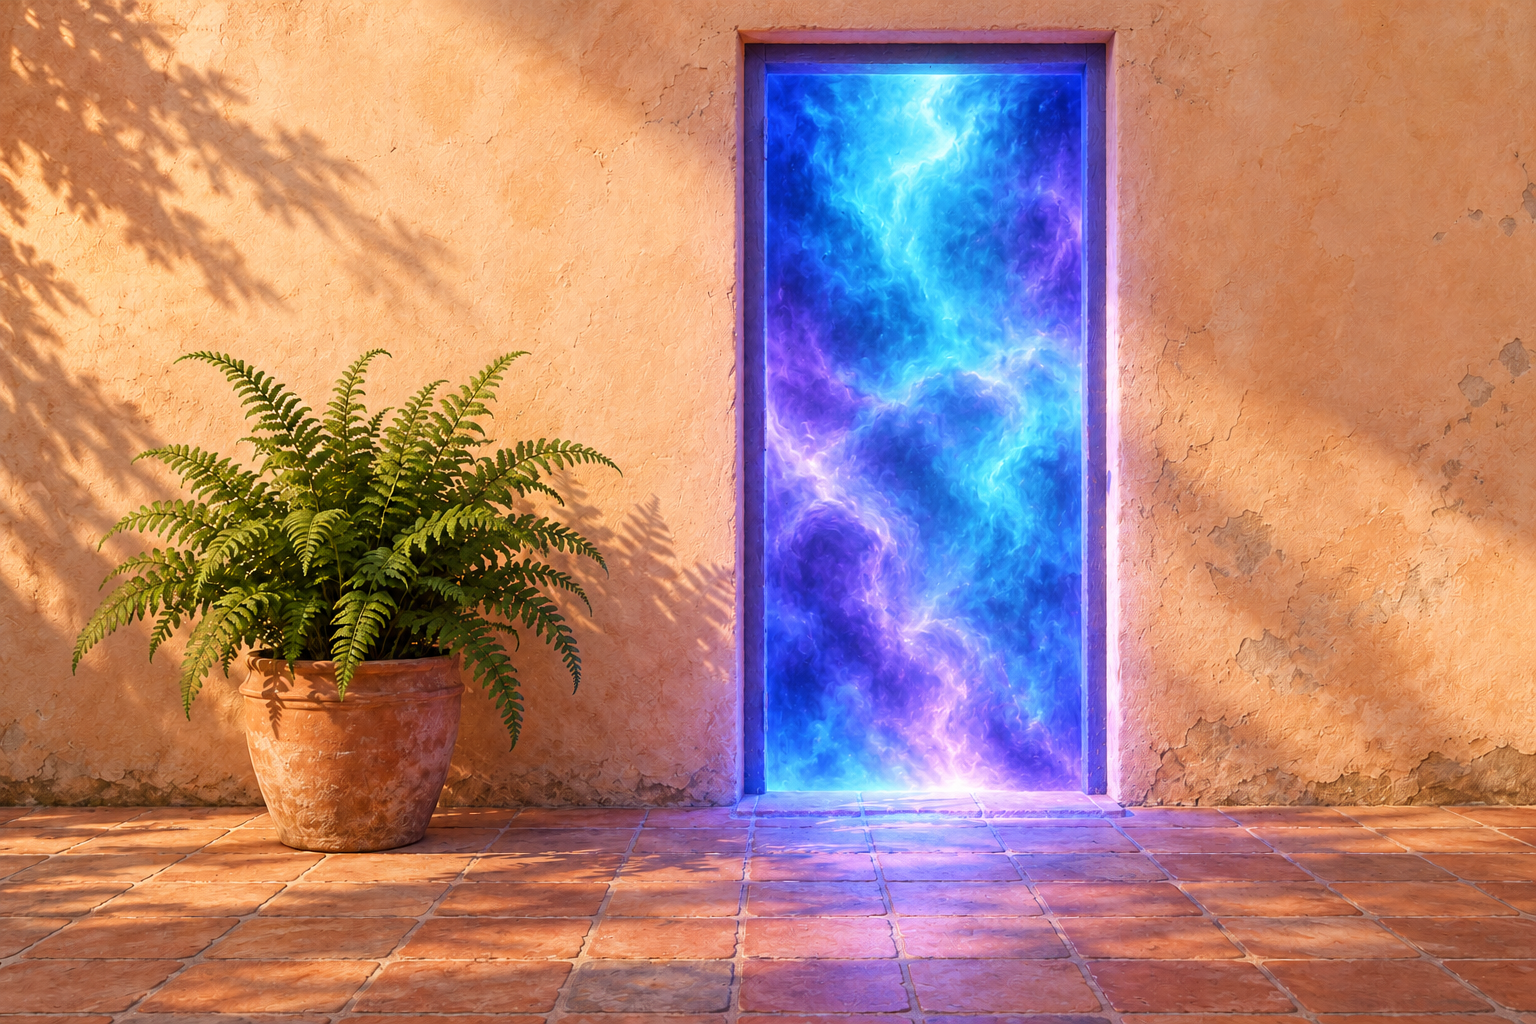
Our original example changes a closed courtyard door into a luminous portal. It includes the generated clean-plate concept, the actual reference-led effect still, a filled visual review and a local pixel-difference report. No moving footage was generated for this exercise, so it does not establish tracking, temporal consistency or video-editor performance.
For narration cleanup before picture assembly use our Auto-Editor first-pass study with downloadable source and actual cut.
Choose the VFX job before choosing the operation
For a concept still, an image-editing operation can help decide the effect’s appearance. For an existing performance or camera move, inspect a supported video-editing route. For a layered finish, keep the foreground, effect and background elements separately controllable where the project needs that flexibility.
Adobe’s compositing overview describes combining video clips or images through layering. A generated flattened picture is a different deliverable from a project with editable layers. Decide what needs to remain adjustable before accepting the export.
Prepare a clean reference for the intended change
The native courtyard source is an original AI-generated clean-plate concept, not a photograph of a real location. It contains a closed cobalt door, a pale peach wall, terracotta floor tiles and one fern in a pot. The simple locked viewpoint makes the intended replacement easy to identify.
For a filmed scene, keep the actual source footage and any useful background reference. Record what should change, where it should appear and which parts need protection. A clean still can explain a look, but it cannot replace the movement, occlusion and lighting information in the real shot.
Request one effect with explicit preservation goals
Replace the wooden blue door panel inside its existing rectangular frame with a luminous cyan and violet portal surface. Keep the doorway frame, peach wall, tiled floor, fern, camera angle and composition recognizable. Remove the handle with the replaced panel. Add restrained cool light spill near the threshold. No people, new props, debris, text or logos.
This is the original direction used for our reference-led still edit. The allowed change includes both the portal and its nearby light spill. That matters during review: a cool patch on the floor is intentional here, while a new object or displaced plant would require a separate decision.
Start with a single effect before adding camera movement, a character crossing the opening and several transformations. Each extra action introduces another relationship to inspect. Keep the first accepted look with the brief so later takes have a clear visual target.
Inspect the actual effect still against the source
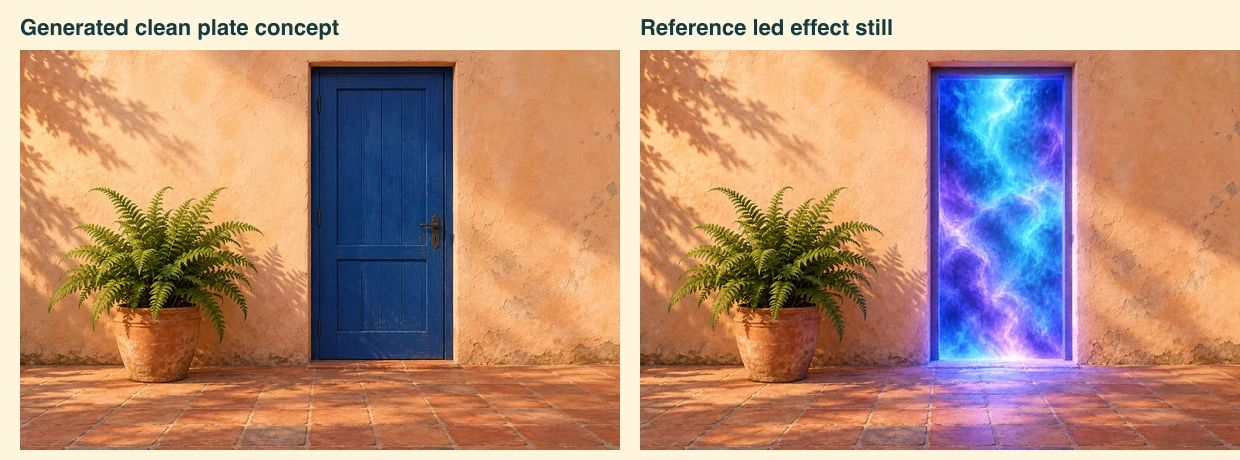
The native portal still shows the requested luminous replacement and no door handle. Visual inspection found one fern and pot, a recognizable doorway and the courtyard composition. Cool light extends across nearby floor tiles. The filled visual review records those observations as broad scene checks rather than exact geometry measurements.
Inspect the frame edge, the threshold and the plant silhouette at full size. Then review the complete image at its intended delivery size. A spectacular effect can still have an unclear boundary, an implausible contact region or a foreground object changed outside the brief.
Check file changes without inventing a quality score
We compared a declared 600 by 250 pixel patch in the top-left wall area of the two equally sized native files. The actual decoded RGB report records changed values at 149,886 of 150,000 pixels, with mean absolute channel difference about 7.55 on a zero-to-255 scale.
That measurement establishes differences in the files, not their cause or artistic acceptability. Color, texture and lighting changes can affect it. It does not prove that every visible wall feature changed, nor does it establish protected source pixels. The distinction is useful when a visually similar edit must satisfy a stricter preservation requirement.
The local difference script uses Sharp to decode the files without resizing or alignment and inspects only that declared patch. Run it with Bun and Sharp 0.34.5, followed by the source and edit paths. It performs no model inference and is not a general image-quality or tracking test.
Take the accepted look into a video test
Runway’s Edit Studio guide describes transforming existing footage with prompts through Aleph. That is a documented video-editing route, not the tool used to create these specimens. Check the current operation, input limits and account quote before preparing a request.
For the portal, begin with one short continuous take and a simple camera setup. Review whether the doorway stays attached to the wall throughout the clip, whether light changes continuously and whether a foreground object crosses the effect correctly. Inspect the first usable frame, the middle and the last, then watch the whole sequence at normal speed.
Use the blank temporal review ledger for actual take identifiers and frame or time observations. It contains no completed video result. Listen to the full export when audio is present, and keep sound approval separate from the visual effect decision.
Keep source materials and revision controls
Download the comparison layout source and both native images to rebuild the side-by-side WebP with Bun and Sharp 0.34.5. The script expects the images beside it and an output path as its argument. It reproduces the layout, not the generative edit. The provenance record identifies the resources by hash.
If the finish needs an editable mask, separate glow treatment or foreground matte, retain those materials in the actual production workflow. A single flattened output does not supply them automatically. For source layers and an environment plate, continue with the matte-painting study. For a short narrative cut, use the AI trailer workflow.
Explore Clout Image and Video for available operations and verify their supported inputs. Keep a good-looking concept, a completed video operation and a reviewed final effect as distinct stages of the work.