

An AI skin texture enhancer should improve the problem you can name without turning a recognizable face into a polished stranger. For a creator portrait, start with the full-resolution source, define a restrained retouch and compare the exported face at equal size. Smoothing, detail reconstruction and adding generated texture are different operations.
This guide uses an original fictional adult portrait and an actual reference-based edit. The images are editorial examples generated for the guide, not a benchmark of Higgsfield, Adobe or Clout's interface. The source and edit are available to download so you can inspect the changes rather than relying on a tiny before-and-after thumbnail.
Decide what skin enhancement means for your image
A cheek with a temporary blemish, a heavily compressed selfie and a generated face with waxy skin need different fixes. A smoothing filter may reduce visible variation, but it cannot establish that missing pores were recovered correctly. A generative editor may add plausible texture that was absent from the source. For a fictional character, plausible detail can be useful; for a real portrait, it remains generated detail.
| Problem | First operation to consider | Approval check |
|---|---|---|
| Small temporary blemish | Local healing or restrained masked edit | Nearby freckles and texture remain |
| Broad unwanted color cast | Color correction | Natural skin tone under the intended light |
| Visible compression artifacts | Better original or artifact reduction | No halos or smeared eyelashes |
| Waxy generated face | Controlled reference-based texture revision | Face remains recognizable and pores avoid a repeating pattern |
| Different lighting across a set | Lighting or grading workflow | Skin, clothes and background respond coherently |
Adobe's Neural Filters overview documents Skin Smoothing controls and separate layer or Smart Filter outputs. Higgsfield describes natural texture preservation in its skin-enhancement article. Those are vendor descriptions checked on October 1, 2026, not evidence that either tool preserves every identity detail or outperforms every manual edit. Use the exact feature and version available in the application you selected, then judge the actual export.
Compare our source and referenced edit
The source portrait shows a fictional woman with a dark bob, a cream shirt and a slate-blue background. Her skin has fine visible texture, freckles, cheek redness and a few small blemishes. The edit uses this exact original as its reference rather than generating an unrelated second face.
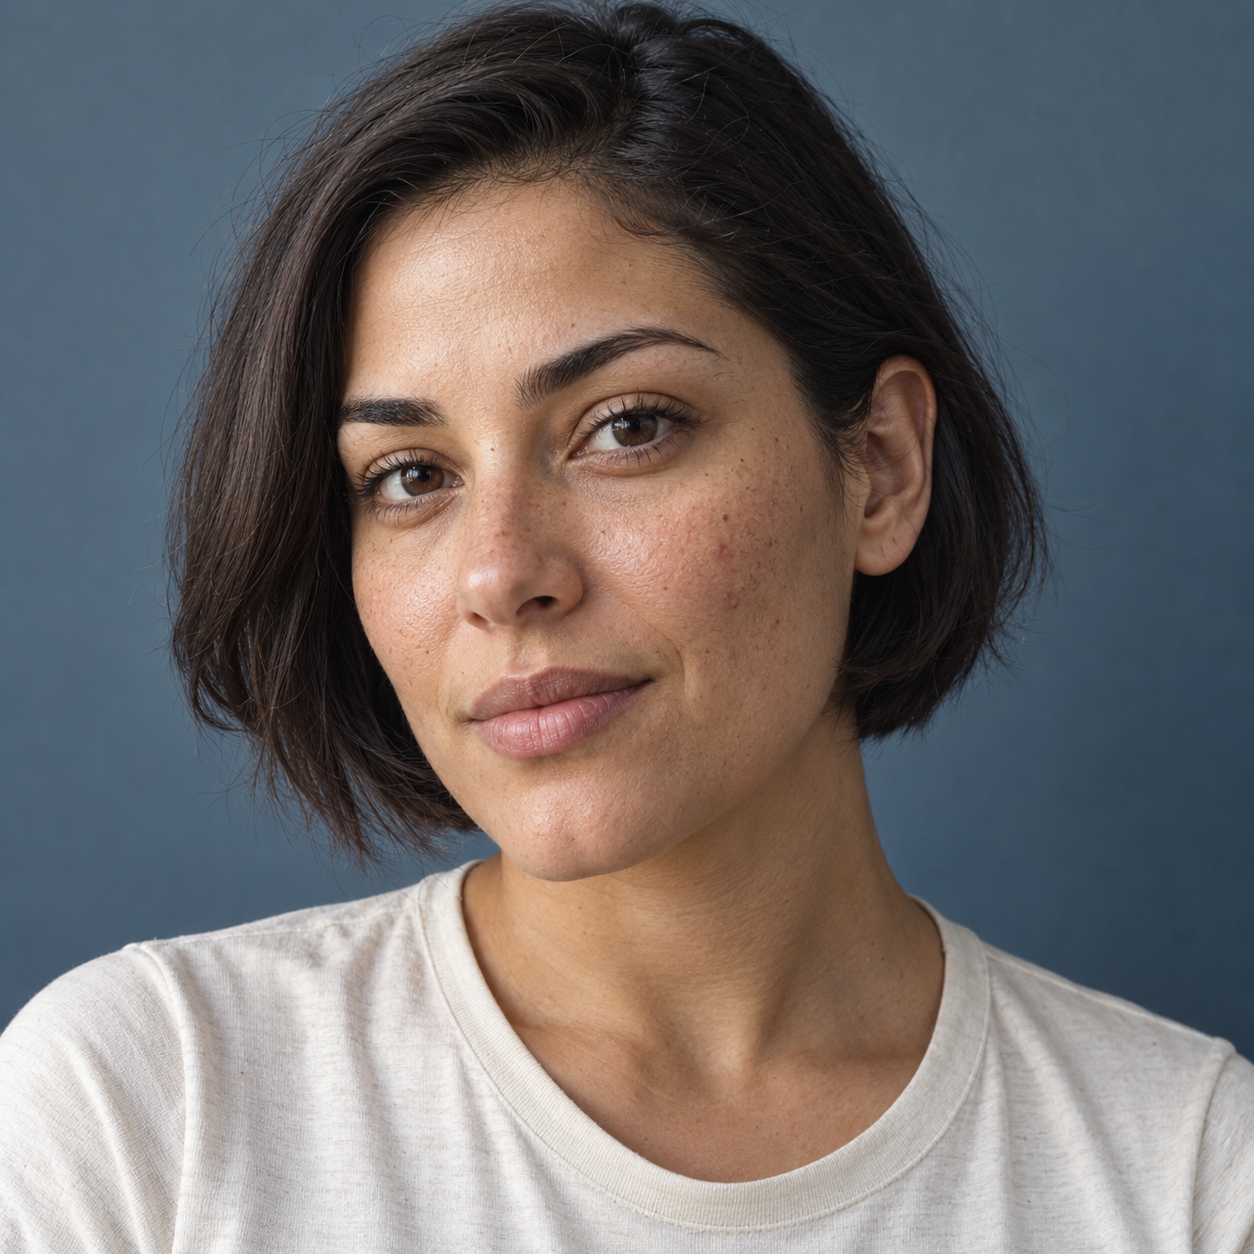
Download the source portrait
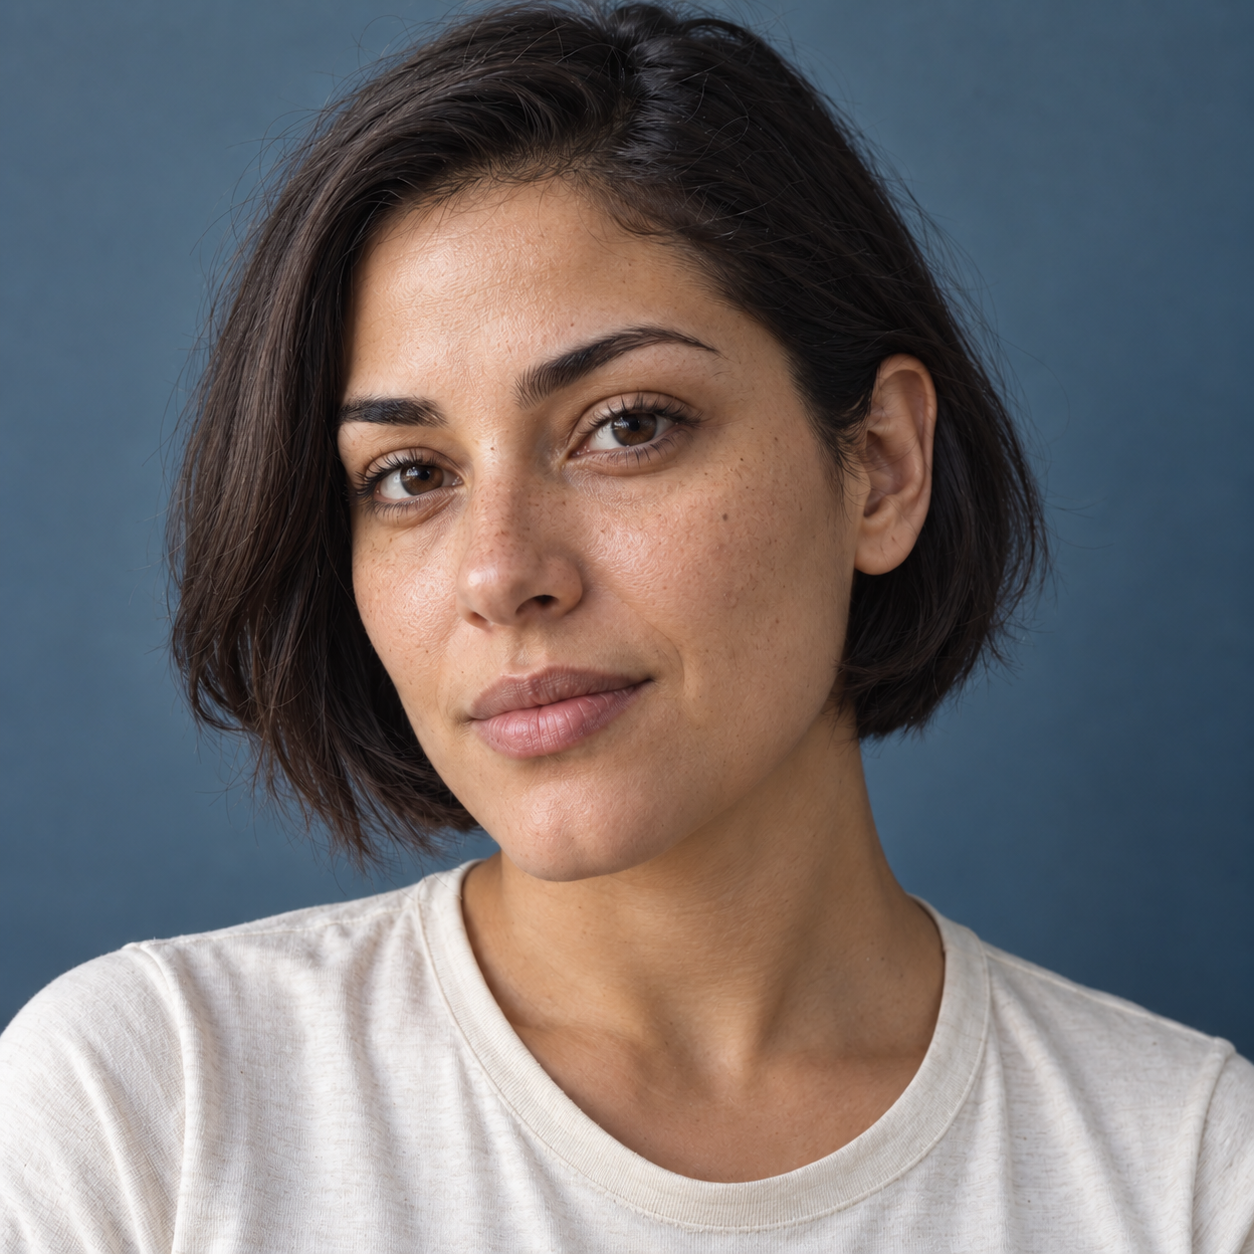
Download the edited portrait
The result reduces visible cheek redness and blemishes while leaving pores and freckles visible. It also subtly changes eye, facial and pore details. It demonstrates a restrained creative retouch, not untouched identity or a pixel-preserving local repair. If the project requires documentary fidelity, compare the real original carefully and prefer a local operation with a controllable affected area.
Download both images and compare them at the same scale. Begin with the full face, then inspect the cheeks, eyebrows, eyelids and hairline. An output can look cleaner at thumbnail size while losing natural texture at full size. The untouched source is part of the deliverable, not a disposable intermediate.
Use a brief that names both changes and invariants
Reduce small temporary cheek blemishes and mild patchy redness in this original portrait. Keep the recognizable face, neutral expression, dark bob, eye color, cream shirt, framing, background and soft side light. Retain freckles, visible fine pores, under-eye texture and natural skin variation. Avoid broad smoothing, whitening, makeup, age changes, reshaping and artificial glossy skin.
This is an original editing brief. It is not a guarantee that every invariant will survive. If a localized mask is available, keep it as narrow as the intended correction allows and review its edge. If the interface uses a broad generative edit, expect that other details may be reconstructed and check them explicitly.
Do not begin by changing skin, hair, makeup, expression and background together. You will have more difficulty identifying the cause of a changed face. Approve the smallest useful edit before developing the campaign styling.
Review real texture instead of maximizing smoothness
Natural skin does not have one identical texture across the face. Forehead, nose, cheeks and under-eye areas respond differently to light. Uniform stippling can look artificial even when it appears sharp. Excessive sharpening can exaggerate pores and create bright edges around eyelashes.
| Area | What to compare |
|---|---|
| Identity | Eye shape, spacing, nose, jaw and expression against the source |
| Texture | Fine variation without plastic smoothing or repeated pore patterns |
| Color | Skin tone under the same light rather than an unrequested whitening change |
| Boundaries | Hairline, eyebrows and lips without smeared or glowing edges |
| Continuity | Clothing, background and crop remain appropriate for the brief |
| Final export | Native dimensions, crop and compression at the destination display size |
Keep rejection notes specific. “Cheek texture became uniform” gives the next revision a clear target. “Make it more realistic” lets the editor reinterpret the whole image again. Keep the rejected image out of the approved reference set.
Download the skin texture review worksheet
Download the editable skin texture review sheet. It contains six review areas: identity, texture, skin tone, boundaries, scene continuity and export. The source observation, edited observation, decision and revision notes fields are blank. Use it to record your own image review rather than assume our observations apply to another edit.
Open the source and edited files at equal sizes. Record what changed before rating whether it improved. Keep the original, prompt and completed review together. Both images are native 1254 by 1254 lossless WebP downloads whose decoded pixels match their generated PNG masters. A lossless export preserves the output file's pixels; it does not mean the edit preserves every pixel from the original portrait.
Free skin texture tools need an export check
A free preview is useful only if you can inspect the result you intend to use. Check current account requirements, downloadable dimensions, watermark conditions and usage terms in the actual selected service. The original example images and review worksheet on this page can be downloaded without an account. Creating or processing your own portrait depends on the selected editor and its current conditions.
Compare accepted results rather than counting generations. Record the number of attempts, export size and time spent repairing detail changes. A free image that needs a face reconstruction can cost more editing time than a controlled paid operation. Conversely, a small local correction may be enough without generating a new face.
Build a coherent creator photo set
Create your original AI character in Clout, approve the face and build campaign photos around a consistent visual direction. Keep a reference folder with the original, accepted edit, prompt and review notes. Match the intended skin finish across scenes instead of applying the strongest smoothing setting independently to every photo.
A close portrait, a waist-up scene and a product interaction reveal different problems. Review all three at equal face size before accepting the campaign. If a product or recognizable person must remain exact, inspect their features separately rather than using a skin approval as proof that the rest of the image is correct.
A still-image skin edit does not establish stable video retouching. Motion introduces changing light, expression and occlusion. Use documented video support and review the finished clip for flicker, moving pore patterns and changing facial geometry before applying a look to a sequence.


